I was standing in my tiny kitchen, a half‑finished batch of store‑bought chocolate cookies crumbling in my hands, when my roommate dared me to make something that would actually make people gasp. “I dare you to taste this and not go back for seconds,” she said, eyes glittering with the kind of mischievous confidence that only a true snack‑lover can muster. I laughed, grabbed the nearest bag of almond flour, a jar of creamy peanut butter, and a bar of dark cocoa, and set out on a culinary quest that would end with a plate of macarons that could easily out‑shine any patisserie. The air was already humming with the promise of something sweet, salty, and impossibly smooth.
Picture this: the oven’s warm breath mingling with the deep, earthy perfume of cocoa, the faint metallic snap of egg whites being whisked into glossy peaks, and the buttery, nutty whisper of peanut butter as it melts into a glossy ganache. My hands felt the cool, powdery texture of almond flour slipping through my fingers like fine sand, while the kitchen timer ticked a steady rhythm that felt like a drumroll before the grand reveal. I could almost taste the contrast of the crisp, airy shell that would crack delicately under my teeth, giving way to a silky, chocolate‑peanut butter center that clung to the palate like a velvety hug.
Most macaron recipes I’ve tried either fell flat, turned rubbery, or simply never achieved that perfect “piped‑perfect” shape. Most recipes get this completely wrong. Here’s what actually works: a precise balance of dry and wet ingredients, a meticulous folding technique called the “macaronage,” and a secret ingredient that adds a luxurious depth without overpowering the classic flavors. I’m talking about a splash of high‑quality vanilla extract that lifts the whole profile, and a pinch of salt that makes the chocolate sing like a diva on stage.
And now the fun part: I’m going to reveal a technique that most bakers overlook—a brief resting period for the piped shells that creates that coveted “feet” on the bottom of each macaron, giving them that elegant, raised edge that looks like a tiny, edible pedestal. Okay, ready for the game‑changer? Let me walk you through every single step — by the end, you’ll wonder how you ever made it any other way.
What Makes This Version Stand Out
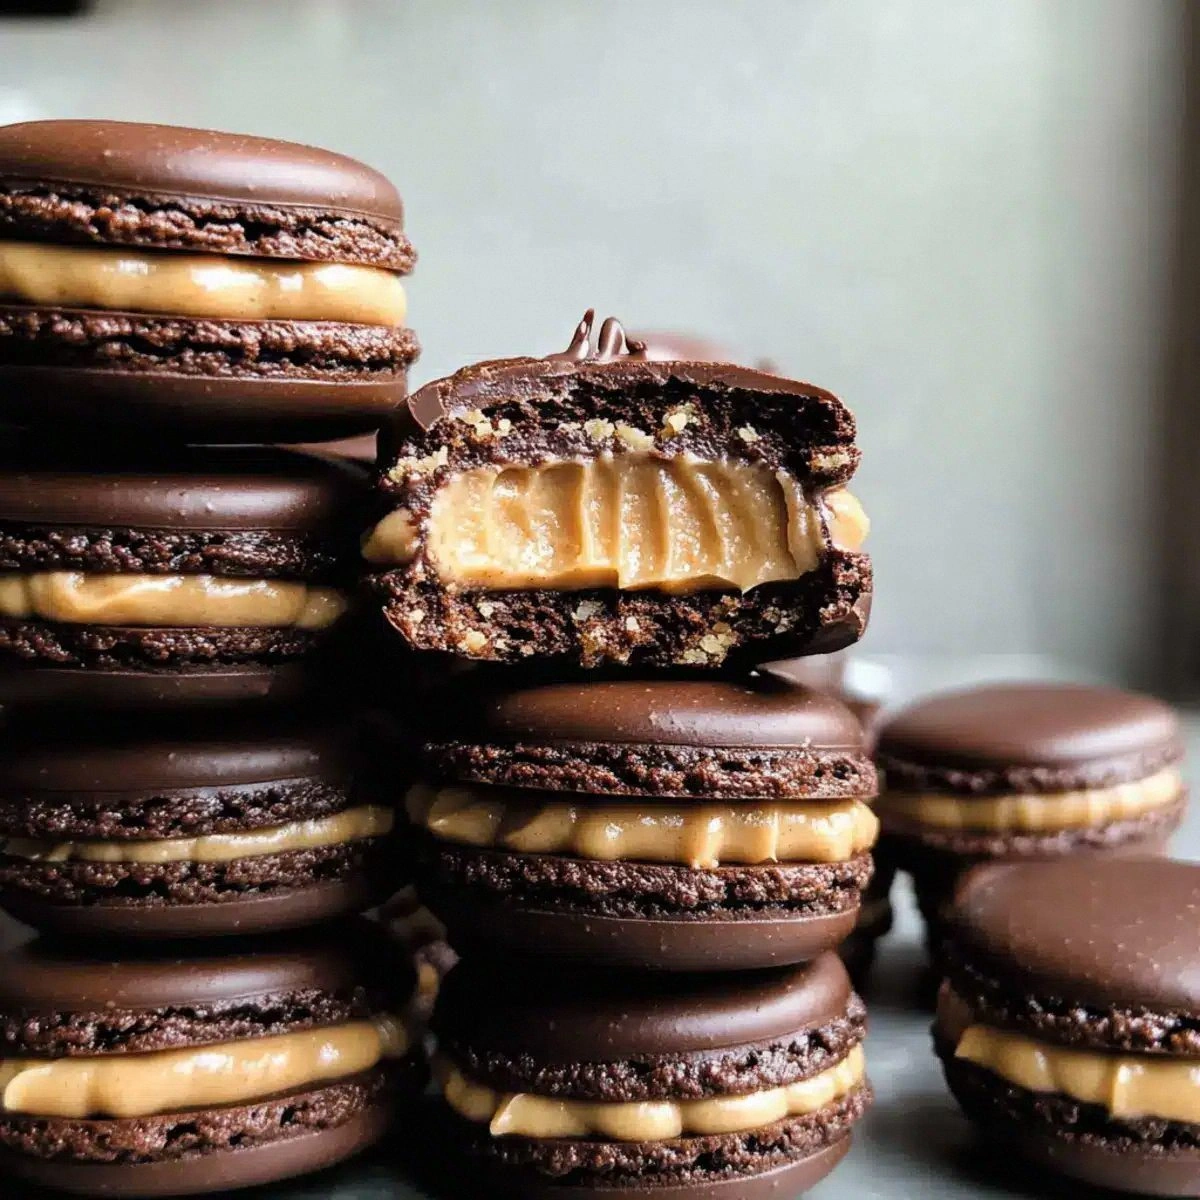
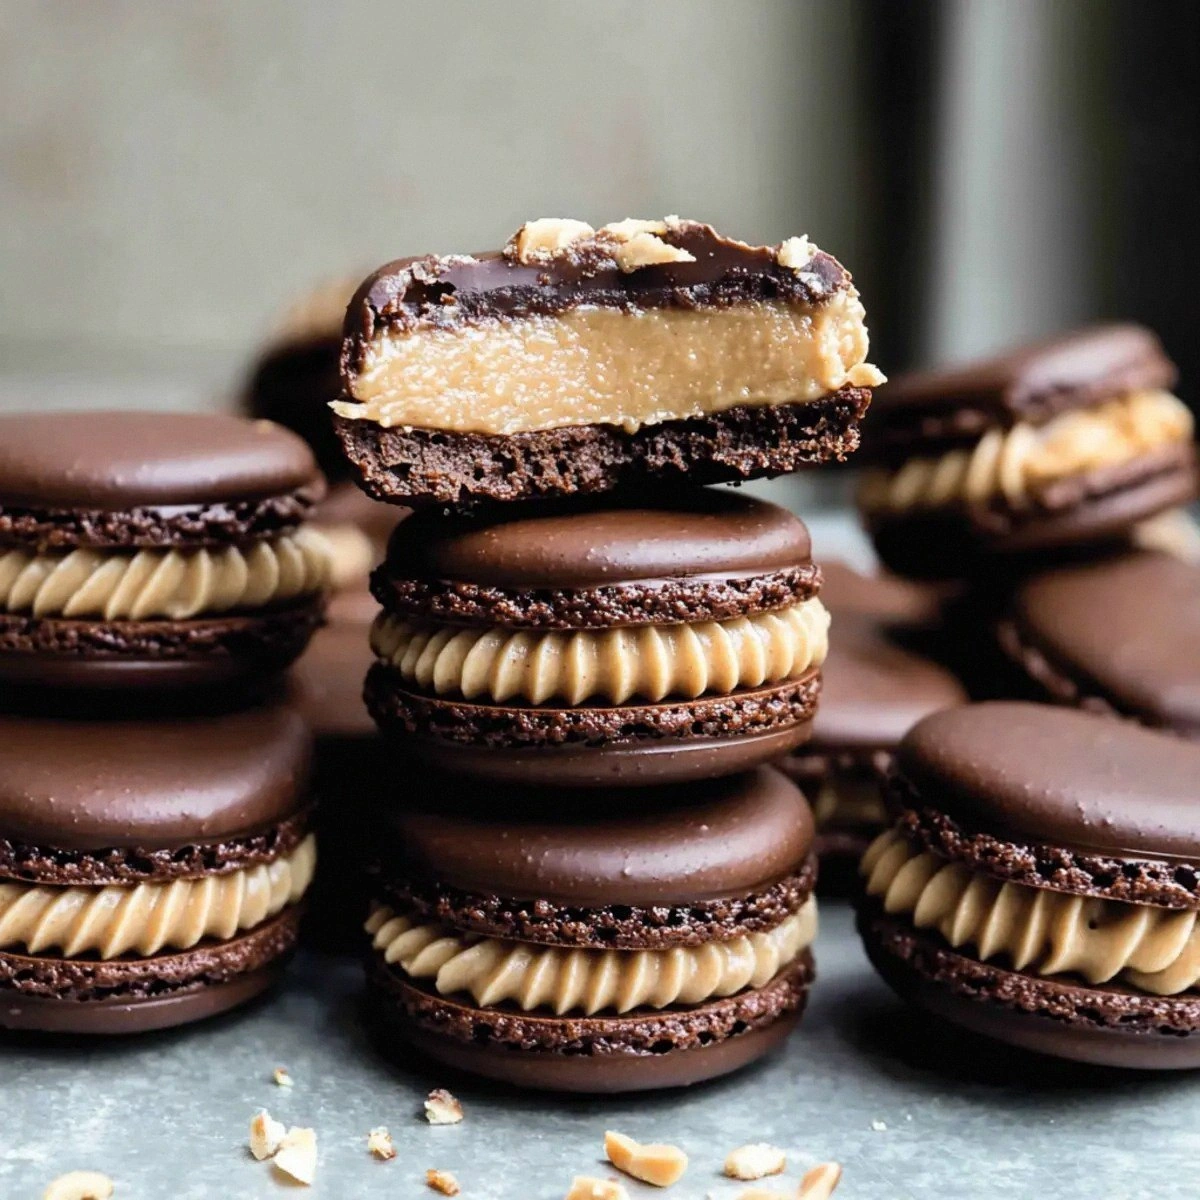
- Flavor Explosion: The marriage of rich cocoa and creamy peanut butter creates a taste that’s both nostalgic and sophisticated, like a childhood favorite upgraded with a gourmet twist.
- Texture Harmony: The shells are crisp on the outside, slightly chewy in the middle, and the filling is buttery smooth, delivering a multi‑layered mouthfeel that keeps you reaching for more.
- Simplicity Meets Precision: While the technique is classic French, the ingredient list is short and straightforward, making it accessible for home bakers without sacrificing professional results.
- Unique Ingredient Pairing: Peanut butter isn’t a traditional macaron filling, but its salty richness cuts through the chocolate’s bitterness, achieving a perfect balance.
- Crowd‑Pleaser Factor: I’ve watched adults and kids alike stare at the tray, eyes widening, then immediately dive in — this is hands down the best version you’ll ever make at home.
- Ingredient Quality: Using real almond flour and high‑quality cocoa ensures no gritty aftertaste, while a good natural peanut butter adds depth without artificial flavors.
- Make‑Ahead Magic: These beauties keep well in the fridge for up to three days, and the shells can be frozen for months, so you can prep ahead for parties.
- Visual Wow Factor: The glossy, dark shells with a subtle sheen and the glossy peanut butter swirl inside look as good as they taste, perfect for Instagram.
Inside the Ingredient List
The Flavor Base
First up, the cocoa powder. At 40 grams, it gives the shells a deep, almost midnight hue while imparting a subtle bitterness that balances the sweet peanut butter. If you skip the cocoa, you’ll end up with plain‑looking shells that lack that sophisticated edge. For a richer flavor, consider using Dutch‑process cocoa, which has a smoother, less acidic profile. When buying, look for a cocoa that smells chocolatey, not musty—freshness matters.
The Texture Crew
Almond flour is the heart of any macaron. The 100 grams in this recipe provide a delicate crumb that’s both light and sturdy enough to hold the filling. Skipping almond flour or substituting with regular flour will make the shells dense and heavy. If you have a nut allergy, you can try a finely ground sunflower seed flour, but expect a slightly different flavor. Always sift the almond flour twice to avoid any gritty texture.
The Unexpected Star
Peanut butter, at 150 grams, is the secret hero that turns this macaron from ordinary to unforgettable. It adds a creamy, salty richness that cuts through the cocoa’s bitterness. Use a natural, unsweetened peanut butter for the best texture; the oil separates, creating a glossy, smooth ganache. If you’re allergic to peanuts, almond butter works as a close cousin, though the flavor will shift toward a milder, nutty note.
The Final Flourish
Egg whites and sugars are the binding and sweetening agents. Four large egg whites, when beaten to stiff peaks, create the airy structure that gives macarons their signature “feet.” Granulated sugar (100 g) stabilizes the meringue, while powdered sugar (200 g) mixes with almond flour to form the dry base. A pinch of salt amplifies the chocolate and peanut butter flavors, making them pop like fireworks. Vanilla extract (1 tsp) adds a fragrant backdrop that ties everything together.
Everything's prepped? Good. Let's get into the real action…
The Method — Step by Step
Start by separating the egg whites from the yolks, making sure no yolk contaminates the whites. I dare you to taste this and not go back for seconds, but first we need a flawless meringue. Place the whites in a clean, dry mixing bowl, then whisk on medium speed until they become frothy. Add the granulated sugar a tablespoon at a time, letting each addition dissolve before the next. Keep whisking until you reach stiff peaks that stand up like tiny white towers, glossy and firm.
Kitchen Hack: If your mixer is struggling, add a pinch of cream of tartar to stabilize the meringue and achieve a glossy finish.While the meringue rests, sift together almond flour, powdered sugar, and cocoa powder into a large bowl. The sifting process not only removes lumps but also aerates the mixture, which is crucial for the lightness of the shells. If you hear a faint “whoosh” as the powder falls, that’s the sound of future perfection. Set this dry blend aside for the macaronage.
Now comes the macaronage: gently fold the dry mixture into the meringue. Use a rubber spatula, turning the bowl over the top, and scrape the sides continuously. This step is the most delicate—over‑mix and the batter will be runny, under‑mix and it will be too stiff. The batter should flow like lava that’s just thick enough to hold its shape when you lift the spatula. It should form a ribbon that slowly disappears back into the mixture after a few seconds.
Watch Out: Over‑mixing at this stage destroys the air bubbles you spent time creating, resulting in flat, dense shells.Transfer the batter to a piping bag fitted with a ½‑inch round tip. Pipe 1‑inch circles onto a parchment‑lined baking sheet, leaving about an inch of space between each. Tap the tray firmly on the countertop three times to release any trapped air bubbles and to settle the batter evenly. The tops should look smooth and slightly domed; if you see cracks, you’ve missed the resting step.
Let the piped shells rest at room temperature for 30‑45 minutes, or until a skin forms on the surface. You’ll know they’re ready when you can lightly touch the tops without any stickiness. This “drying” phase is where the iconic “feet” develop during baking. If you’re in a humid environment, extend the time; the goal is a matte, dry surface.
Preheat your oven to 150 °C (300 °F). Slide the tray into the middle rack and bake for 12‑15 minutes. The shells should rise gently, their bottoms turning a delicate golden‑brown. The edges will start pulling away from the parchment, and you’ll hear a faint “crackle” as the shells set. Do not open the oven door early; the heat needs to stay steady.
While the shells cool, prepare the ganache. Melt the butter (100 g) and peanut butter (150 g) together over a low‑heat saucepan, stirring until completely smooth. Add the vanilla extract and a pinch of salt, then whisk in a splash of warm water if the mixture feels too thick. The ganache should be glossy, pourable, and thick enough to hold its shape when piped.
Once the shells are completely cool (touch them; they should feel room‑temperature), pair them by size. Pipe a generous dollop of ganache onto the flat side of one shell, then sandwich it with its partner, pressing gently so the edges meet. The filling should ooze slightly, creating a glossy seam that glistens like a tiny lake of chocolate‑peanut butter.
Let the assembled macarons mature in the refrigerator for at least 24 hours. This “aging” step allows the flavors to meld, and the shells soften just enough to become melt‑in‑your‑mouth without losing their structure. When you finally bite into them, you’ll hear that satisfying “crack” of the shell followed by a creamy, velvety center that feels like a dream.
That’s it — you did it. But hold on, I’ve got a few more tricks that'll take this to another level. Stay with me here — this is worth it.
Insider Tricks for Flawless Results
The Temperature Rule Nobody Follows
Never bake macarons at a temperature higher than 155 °C. Higher heat creates a rapid rise that can cause the shells to crack or brown too quickly, leaving you with a rubbery texture. I once tried 180 °C to speed things up; the result was a flat, uneven batch that looked more like a sad pancake than a macaron. Keep the oven low and steady, and you’ll get that perfect “foot” that looks like a tiny pedestal.
Why Your Nose Knows Best
During the resting stage, trust your sense of smell. When the shells develop a faint, nutty aroma, they’re ready for the oven. If you smell a raw eggy scent, give them a few more minutes. This sensory cue is a game‑changer, especially if you’re in a kitchen without a humidity meter.
The 5‑Minute Rest That Changes Everything
After piping, give the shells a brief 5‑minute “micro‑rest” before the full 30‑minute drying period. This short pause lets the surface tension settle, preventing the dreaded “pancake” effect where the shells spread too thin. I’ve seen beginners skip this, and their macarons end up looking like flat discs rather than elegant domes.
Butter‑Peanut Ganache Consistency Hack
If your ganache feels too runny after mixing, whisk in a teaspoon of powdered sugar while it’s still warm. This thickens it without altering the flavor, giving you a piping consistency that holds its shape. A friend tried skipping this step once — let’s just say the filling leaked out of the shells like a chocolate river.
The “No‑Stick” Parchment Trick
Line your baking sheet with parchment paper, then lightly dust it with a mixture of powdered sugar and cocoa. This creates a non‑stick surface that also adds a subtle extra chocolate note to the bottom of each shell. If you skip this, the shells can stick, tearing the delicate feet you worked so hard to create.
Creative Twists and Variations
This recipe is a playground. Here are some of my favorite ways to switch things up:
Salted Caramel Swirl
Swap half the peanut butter for a smooth caramel sauce, then sprinkle flaky sea salt on top before sealing. The sweet‑salty combo adds a luxurious depth that pairs beautifully with the chocolate shell.
Espresso Infusion
Add a tablespoon of finely ground espresso to the cocoa powder. The coffee notes amplify the chocolate, creating a mocha‑like experience that’s perfect for brunch.
White Chocolate Raspberry
Replace the cocoa with white chocolate chips melted into the dry mix, and fold in a spoonful of raspberry jam into the ganache. The bright fruit tang cuts through the richness for a summer‑ready treat.
Nutty Crunch
Fold toasted, finely chopped hazelnuts or pistachios into the almond flour blend. The added crunch gives a textural surprise that makes each bite more interesting.
Spicy Chili Chocolate
Incorporate a pinch of cayenne pepper into the cocoa powder. The subtle heat wakes up the palate and makes the macarons unforgettable for adventurous eaters.
Storing and Bringing It Back to Life
Fridge Storage
Place the assembled macarons in an airtight container and store them in the refrigerator for up to three days. The cool environment keeps the ganache firm and the shells crisp. Before serving, let them sit at room temperature for 15‑20 minutes so the flavors fully awaken.
Freezer Friendly
Both shells and assembled macarons freeze beautifully. Store shells in a zip‑top bag with parchment between layers for up to two months. For fully assembled treats, place them in a single layer in a container, then cover tightly; they’ll last three months. Thaw overnight in the fridge, then bring to room temperature before enjoying.
Best Reheating Method
If the macarons have lost a bit of their bite, pop them in a preheated oven at 120 °C (250 °F) for 5‑7 minutes. Add a tiny splash of water to the baking tray (just a few drops) to create a gentle steam that revives the shells without drying them out. The result is a freshly‑baked feel that tastes like you just pulled them from the oven.