Picture this: it’s a rainy Saturday afternoon, the kind where you’re stuck inside, scrolling through endless food blogs, and a sudden craving for something that screams “party in my mouth” hits you like a thunderclap. I was rummaging through the pantry, half‑heartedly eyeing a bag of Mint Oreo cookies, when a dare from my roommate—“Make something that’ll make me forget my name” — pushed me into the kitchen with a mischievous grin. The first bite of a store‑bought mint‑chocolate dessert was decent, but the texture was flat, the flavor was one‑note, and the aftertaste left me longing for more. That night I decided to combine the crunchy, minty snap of Oreos with the silky richness of cream cheese and a glossy chocolate shell, and after a few trial runs (and a few stolen bites), I finally nailed a version that feels like a bite‑sized celebration every single time.
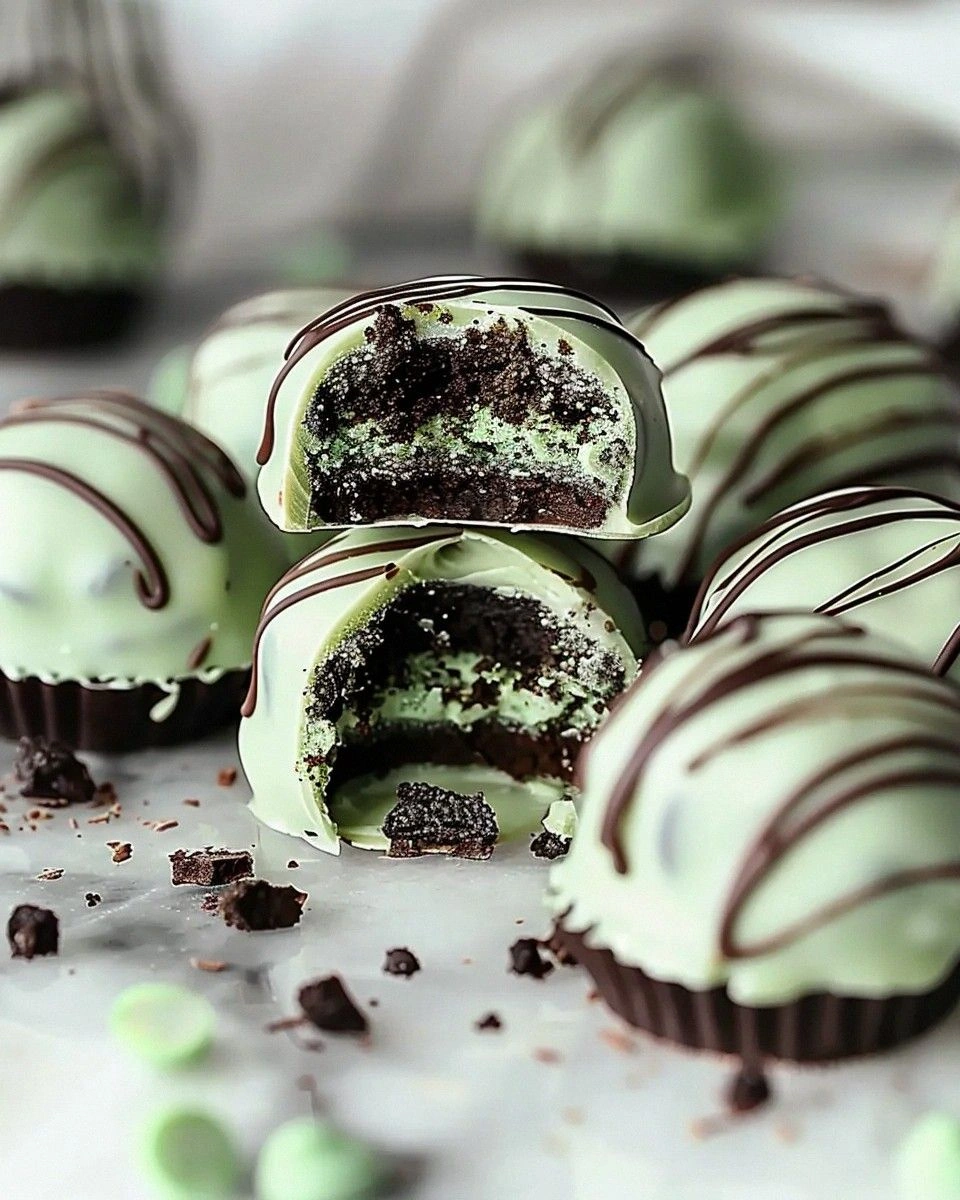
What sets this batch apart is the perfect marriage of contrast: the cookie crumbs give you a satisfying crunch that shatters like thin ice, while the cream cheese center melts in your mouth like velvet, and the chocolate coating adds a glossy finish that snaps with a satisfying snap. I’ve tried the usual shortcuts—using pre‑melted chocolate chips or swapping out the mint Oreos for regular ones—and they either turned out gummy or bland. This recipe, however, embraces the mint flavor fully, and the optional green food coloring gives it a festive pop that’s perfect for holidays or just because you feel like being a little extra. I dare you to taste this and not go back for seconds; the balance is so spot‑on you’ll wonder how you ever settled for anything less.
Most recipes get the coating wrong, either by overheating the chocolate and making it grainy, or by under‑coating and leaving a dull finish. Here’s what actually works: a gentle double‑boiler melt, a quick chill of the truffle balls, and a swift dip that locks in the creamy interior while keeping the outer shell glossy and firm. I’ll be honest — I ate half the batch before anyone else got a chance to try it, and that’s because the flavor hits you like a cool breeze on a hot day, refreshing yet indulgent. The secret ingredient that most people overlook is the quality of the Mint Oreo cookies; they bring a buttery crunch and a burst of peppermint that you can’t replicate with extracts alone.
Now, picture yourself pulling these truffles out of the fridge, the whole kitchen smelling like a mint‑chocolate wonderland, the glossy spheres catching the light like tiny emerald gems. This next part? Pure magic. Stay with me here — the steps are simple, the ingredients are minimal, and the payoff is a batch of truffles that will have your friends asking for the recipe while you smugly point to the pantry for the “secret” cookies. Let me walk you through every single step — by the end, you’ll wonder how you ever made it any other way.
What Makes This Version Stand Out
- Flavor Explosion: The mint from the Oreos isn’t just a hint; it’s a full‑on burst that pairs perfectly with the richness of cream cheese and chocolate, creating a layered taste experience.
- Texture Harmony: You get a crunchy crumb, a silky interior, and a firm chocolate shell—all in one bite, delivering a satisfying contrast that keeps you reaching for more.
- Simplicity: No fancy equipment, no obscure ingredients—just pantry staples and a couple of minutes of hands‑on time, making it accessible for beginners.
- Visual Appeal: The optional green food coloring turns each truffle into a festive jewel, perfect for parties, holidays, or simply brightening up a dull day.
- Crowd‑Pleaser: Whether you’re serving kids, teens, or adults, the mint‑chocolate combo is universally loved, and the bite‑size format makes it easy to share.
- Ingredient Quality: Using genuine Mint Oreo cookies ensures an authentic mint flavor that artificial extracts can’t match, elevating the whole recipe.
- Make‑Ahead Friendly: These truffles keep beautifully in the fridge for up to a week, and they even freeze well, so you can prep ahead for any occasion.
- Customizable Coating: Choose white chocolate for a sweet, milky finish or dark chocolate for a bittersweet edge; both work beautifully with the minty core.
Inside the Ingredient List
The Flavor Base
Mint Oreo cookies are the star of the show, providing that unmistakable peppermint punch and a buttery crunch that forms the backbone of each truffle. If you skip these and use plain Oreos, you’ll lose the minty zing that makes the truffles feel fresh rather than heavy. For the best results, crush the cookies finely but leave a few larger pieces for texture; this prevents the filling from becoming a uniform paste.
When selecting Mint Oreos, look for the ones with a vibrant green filling and a crisp chocolate wafer; the fresher the package, the brighter the mint flavor. If you’re feeling adventurous, you can swap in a different mint‑flavored cookie, but be prepared for a subtle shift in taste. A quick tip: place the cookies in a zip‑lock bag and roll a rolling pin over them for an even crush without turning them into powder.
The Texture Crew
Cream cheese is the binding agent that turns crumbly cookie dust into a smooth, pliable dough that you can roll into perfect balls. Using full‑fat cream cheese is crucial; low‑fat versions tend to be watery and won’t hold together, resulting in crumbly truffles that fall apart during coating. Soften the cream cheese to room temperature before mixing; this prevents lumps and ensures a silky texture.
If you’re dairy‑intolerant, a plant‑based cream cheese works, but expect a slightly different mouthfeel. The key is to choose a brand that mimics the richness of dairy, otherwise the truffle may feel dry. Remember, the cream cheese not only binds but also adds a subtle tang that balances the sweet mint and chocolate.
The Unexpected Star
White or dark chocolate for coating is where you get to play with contrast—white chocolate offers a sweet, milky shell that lets the mint shine, while dark chocolate adds a bittersweet edge that deepens the flavor profile. The quality of chocolate matters; a low‑grade chocolate will melt unevenly and produce a dull finish. I recommend using couverture chocolate or a good melting bar with at least 30% cocoa butter for a glossy, snap‑ready coating.
Optional green food coloring is purely aesthetic, turning each truffle into a festive emerald treat. A few drops are enough; over‑coloring can lead to an artificial taste. If you prefer a natural hue, blend a pinch of matcha powder into the melted chocolate for a subtle green tint and an extra layer of flavor.
The Final Flourish
Sprinkles, crushed Oreos, or chocolate drizzle serve as the decorative finishing touch, adding a visual pop and an extra crunch that elevates the eating experience. Choose colorful sprinkles for a party vibe, or crushed Oreos for an extra cookie crunch that mirrors the interior. If you go for chocolate drizzle, melt a small amount of chocolate separately and use a fork to create elegant ribbons over the set coating.
These toppings are optional, but they transform a simple truffle into a show‑stopping dessert that looks as good as it tastes. Store any leftover toppings in an airtight container to keep them fresh and crisp. And remember, the more contrast you add—both in flavor and texture—the more memorable each bite becomes.
The Method — Step by Step
First, gather all your ingredients and set up a clean workspace. I like to line a baking sheet with parchment paper; it prevents the truffles from sticking once coated. While the chocolate is melting, crush the Mint Oreo cookies into fine crumbs using a food processor or the zip‑lock‑and‑roll method. The crumbs should be fine enough to blend with the cream cheese but still retain tiny bits for texture. Once you’ve got the crumbs, set them aside in a large mixing bowl.
Now, soften the cream cheese by leaving it out for about 30 minutes, or give it a quick zap in the microwave for 10 seconds—just enough to make it pliable. Add the softened cream cheese to the bowl of cookie crumbs and mix vigorously with a spatula until a uniform, dough‑like consistency forms. This is the moment of truth: the mixture should hold together when pressed between your fingers without crumbling.
Kitchen Hack: If the mixture feels too dry, add a teaspoon of heavy cream; it will loosen the dough just enough for easy rolling.Roll the mixture into 1‑inch balls using your hands; this should yield about 20‑24 truffles depending on size. As you roll, keep your hands slightly damp to prevent sticking—just a quick rinse under cool water works wonders. Place each ball onto the prepared parchment sheet, spacing them evenly. Once all balls are formed, pop the tray into the freezer for 15‑20 minutes; this firms them up and makes the coating step smoother.
While the truffles chill, set up a double boiler: fill a saucepan with a couple of inches of water, bring it to a gentle simmer, and place a heat‑proof bowl on top, ensuring the bottom doesn’t touch the water. Add your chosen chocolate (white or dark) to the bowl, stirring constantly until fully melted and glossy. If you’re using green food coloring, now’s the time to add a few drops, swirling until the hue is evenly distributed. Remove the bowl from heat once the chocolate is smooth; overheating will cause it to seize.
Retrieve the chilled truffle balls from the freezer. Using a fork or a specialized chocolate‑dipping tool, dip each ball into the melted chocolate, allowing excess to drip back into the bowl. Rotate the truffle gently to ensure an even coat; the chocolate should cling like a thin veil, not a thick blanket.
Watch Out: Do not let the chocolate sit too long before coating; it will thicken and become difficult to work with, leading to a dull finish.Immediately after dipping, sprinkle your chosen topping—whether it’s colorful sprinkles, crushed Oreos, or a drizzle of chocolate—over the still‑wet coating. The toppings will adhere perfectly if applied before the chocolate sets. For a drizzle, use a spoon to create thin ribbons, letting them harden into elegant patterns.
Kitchen Hack: Place the freshly coated truffles back on the parchment and refrigerate for just 5 minutes; this speeds up the setting without making the chocolate brittle.Once the coating has set—usually after about 10 minutes at room temperature or 5 minutes in the fridge—transfer the truffles to an airtight container. If you’re stacking them, place a layer of parchment between each row to prevent sticking.
Finally, give yourself a well‑deserved pat on the back. Your Mint Oreo Truffles are now ready to be served, photographed, and devoured. Picture the moment your guests bite into that crisp chocolate shell, the mint‑infused crumb melting into the creamy center; it’s a sensory fireworks display that will have everyone asking for the recipe. That’s it — you did it. But hold on, I've got a few more tricks that'll take this to another level...
Insider Tricks for Flawless Results
The Temperature Rule Nobody Follows
Chocolate is fickle; it loves a gentle heat and hates sudden temperature changes. Keep your double boiler water at a low simmer—never a rolling boil—so the chocolate melts evenly without scorching. After melting, let the chocolate cool to about 90°F (32°C) before dipping; this ensures a glossy finish and prevents the coating from becoming too thin.
Why Your Nose Knows Best
Before you even taste, trust your sense of smell. The moment the chocolate starts to emit a rich, buttery aroma, you know it’s ready. If you detect a faint burnt scent, you’ve over‑heated it—discard and start over, because that off‑note will linger in every bite.
The 5‑Minute Rest That Changes Everything
After coating, let the truffles rest for exactly five minutes at room temperature before refrigerating. This short pause lets the chocolate set uniformly, preventing a waxy texture that can happen if you chill them immediately. A friend once tried skipping this step, and the truffles ended up with a dull, chalky shell that fell apart when picked up.
Size Matters
Keep your truffle balls consistent—about one inch in diameter—for even coating and uniform bite size. If some are larger, they’ll need more chocolate, leading to uneven shells and a messy presentation. Using a small ice‑cream scoop helps maintain size consistency without guesswork.
Storage Savior
When storing, place a slice of fresh bread in the container; it absorbs excess moisture, keeping the chocolate glossy and the interior creamy. Change the bread every two days for optimal freshness. This trick saved my truffles from turning gummy after a week in the fridge.
Creative Twists and Variations
This recipe is a playground. Here are some of my favorite ways to switch things up:
Chocolate‑Covered Espresso Truffles
Swap the Mint Oreo cookies for Espresso‑flavored Oreos and use dark chocolate for coating. The result is a sophisticated, coffee‑kissed bite that’s perfect for brunch or an after‑dinner treat.
White Chocolate Coconut Dream
Replace the mint cookies with toasted coconut‑infused Oreos, coat in white chocolate, and roll the finished truffles in shredded coconut. The tropical twist adds a chewy texture and a subtle sweetness.
Red Velvet Oreo Surprise
Use Red Velvet Oreos for the base, add a drop of red food coloring to the chocolate, and finish with a dusting of powdered sugar. These look like mini ruby gems and have a mild cocoa flavor that pairs nicely with the cream cheese.
Nutty Crunch Variation
Mix finely chopped toasted almonds or pistachios into the cookie‑cream cheese mixture before forming balls. Coat in dark chocolate and sprinkle with crushed nuts for an added crunch that elevates the mouthfeel.
Vegan Friendly Version
Swap cream cheese for a plant‑based alternative, use dairy‑free dark chocolate, and ensure the Mint Oreos are vegan (some brands offer a vegan mint cookie). The texture remains luscious, and the flavor stays true to the original.
Holiday Peppermint Bark Fusion
After coating, drizzle with melted white chocolate and sprinkle crushed peppermint candy. The visual effect is reminiscent of a festive bark, making these ideal for Christmas gatherings.
Storing and Bringing It Back to Life
Fridge Storage
Place the truffles in an airtight container lined with parchment paper. They’ll stay fresh for up to seven days, maintaining their creamy interior and glossy coating. If you notice a slight dullness, a quick dip in melted chocolate will revive the shine.
Freezer Friendly
For longer storage, arrange the truffles on a baking sheet, freeze until solid (about 2 hours), then transfer to a zip‑lock bag. They freeze well for up to three months. When you’re ready to serve, let them thaw in the refrigerator for an hour, then bring them to room temperature for the best texture.
Best Reheating Method
To restore that fresh‑out‑of‑the‑fridge feel, place the truffles on a microwave‑safe plate, add a tiny splash of water (about a teaspoon) to the plate, and microwave for 5‑10 seconds. The steam generated will melt the chocolate just enough to bring back its glossy sheen without melting the interior.