Picture this: it’s 2 a.m., the house is quiet, and a sudden craving for something that feels like a coffee‑infused hug wrapped in a cookie‑crunch blanket hits you out of nowhere. I was half‑asleep, rummaging through the pantry, when I stumbled upon a half‑eaten pack of Oreos and a jar of espresso that had been gathering dust. The kitchen lights flickered on, the coffee grinder whirred, and I thought, “What if I could marry the deep, bittersweet notes of mocha with the nostalgic crunch of an Oreo dirt cake?” That reckless question turned into a full‑blown culinary experiment, and the result was nothing short of a revelation.
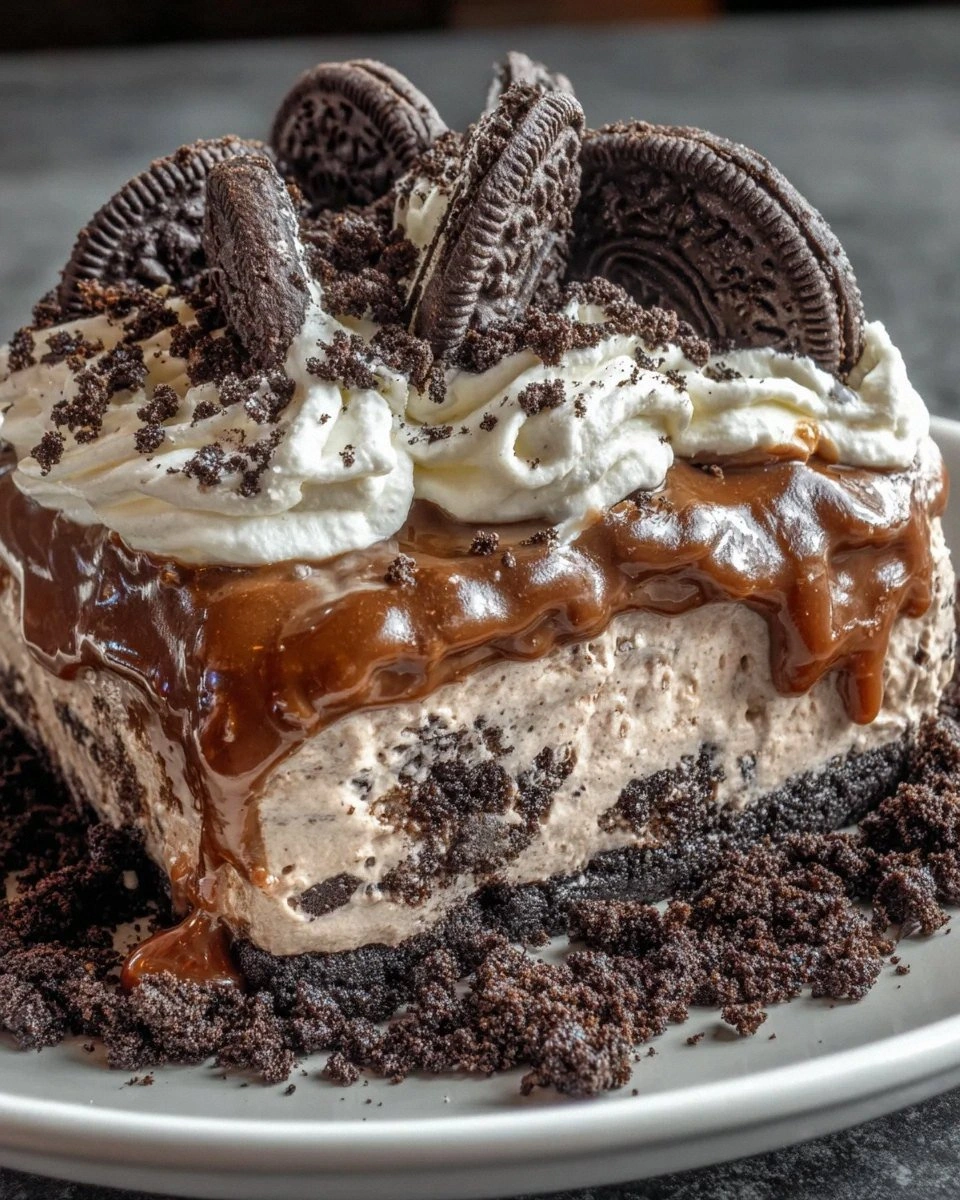
The moment the batter hit the pan, a rich chocolate aroma intertwined with the earthy scent of coffee, creating a perfume that could make even the most stoic neighbor peek through the door. I could hear the faint sizzle as the batter settled, a sound that promised a crisp edge and a soft, fudgy heart. When the cake emerged, its surface was speckled with a dusting of crushed Oreos that looked like a miniature construction site—hence the “dirt” moniker—while a glossy mocha ganache pooled like dark lava over the top. The first bite was an explosion: the bitterness of espresso balanced perfectly with the sweet, creamy frosting, and the Oreo crumbs added a satisfying crunch that shivered through the palate.
Most dirt cake recipes get the texture wrong—either they’re soggy, or the cookie crumbles turn into a mushy mess. This version, however, hits the sweet spot because every component is engineered for contrast: a cake that’s tender yet sturdy enough to hold the weight of the ganache, a frosting that’s airy but rich, and a topping that stays crunchy even after hours in the fridge. I dare you to taste this and not go back for seconds; the combination of mocha depth and Oreo crunch is practically addictive. I’ll be honest—I ate half the batch before anyone else got a chance, and that’s a testament to how irresistibly good it is.
What truly sets this recipe apart is a secret ingredient that most people overlook: a tablespoon of instant coffee granules folded directly into the batter. This tiny addition amplifies the chocolate flavor, turning a good cake into a show‑stopper. And if you think you’ve heard every possible twist on a dirt cake, think again—this one sneaks in a splash of espresso‑infused ganache that gives the top a glossy, almost marble‑like finish. The result is a dessert that looks as impressive as it tastes, perfect for impressing guests or indulging in a solo treat.
Okay, ready for the game‑changer? Let me walk you through every single step—by the end, you’ll wonder how you ever made it any other way. From selecting the perfect Oreos to mastering the art of a glossy ganache, I’ll spill all the secrets, hacks, and pitfalls so you can recreate this masterpiece without a single mishap. Stay with me here—this is worth it.
What Makes This Version Stand Out
- Flavor Explosion: The instant coffee granules boost the chocolate’s depth, creating a mocha flavor that’s richer than any store‑bought mix.
- Texture Symphony: A moist, tender crumb meets a crisp, buttery Oreo “dirt” topping that stays crunchy for hours.
- Simplicity Redefined: Only pantry staples and a handful of specialty items; no fancy equipment required.
- Uniqueness Factor: The espresso‑infused ganache adds a glossy finish and an extra layer of coffee intensity.
- Crowd Reaction: Guests often ask for the recipe before the first slice is even served—talk about a wow factor.
- Ingredient Quality: Using high‑quality dark cocoa powder and fresh espresso makes the difference between good and unforgettable.
- Cooking Method: A single‑pan bake ensures even cooking and a perfectly set crumb that won’t crumble under the weight of the topping.
- Make‑Ahead Potential: The cake can be assembled a day ahead; the ganache even sets up better after a night in the fridge.
Inside the Ingredient List
The Flavor Base
All‑purpose flour (2 cups): The backbone of the cake, providing structure. Using a light, sifted flour ensures a tender crumb. If you skip sifting, you risk a dense texture that can’t support the ganache.
Granulated sugar (1 cup): Sweetness balances the bitterness of coffee. Opt for fine sugar for quicker dissolution; coarse sugar can leave a gritty mouthfeel.
Unsweetened cocoa powder (½ cup): Gives the cake its deep chocolate color and flavor. Choose a Dutch‑process cocoa for a smoother, less acidic taste.
Instant coffee granules (1 tbsp): The secret weapon that intensifies chocolate without adding liquid. If you don’t have granules, dissolve 1 tsp of espresso powder in 1 tbsp of hot water.
Baking powder & baking soda (1 tsp & ½ tsp): Leavening agents that make the cake rise evenly. Too much soda can give a metallic aftertaste, so measure carefully.
The Texture Crew
Butter, melted (½ cup): Adds richness and a buttery mouthfeel. Melted butter coats the flour particles, preventing gluten over‑development for a softer crumb.
Eggs (2 large): Bind the batter and trap air for lift. Room‑temperature eggs mix more easily, preventing a lumpy batter.
Milk (1 cup): Provides moisture. Whole milk yields a richer cake; you can substitute almond milk for a lighter version.
Vanilla extract (2 tsp): Enhances the overall flavor profile, subtly rounding the bitterness of coffee.
The Unexpected Star
Oreo cookies, crushed (12 cookies ≈ 1 cup): The “dirt” that gives the cake its signature look and crunch. Crushing them with a rolling pin keeps larger chunks for texture.
Heavy cream (1 cup): Forms the base of the ganache and the whipped frosting. Whipping it to soft peaks ensures a silky, glossy finish.
Chocolate chips (½ cup): Melt into the ganache for extra depth and a glossy sheen. Use semi‑sweet chips for balanced sweetness.
Espresso (¼ cup, strong brewed): Infuses the ganache with a robust coffee punch. If you’re out of espresso, use extra instant coffee dissolved in hot water.
The Final Flourish
Cocoa powder for dusting (2 tbsp): Adds a final visual contrast and a hint of bitterness that balances the sweet frosting.
Salt (¼ tsp): Enhances all the flavors, especially the chocolate and coffee notes. A pinch too much can dominate, so keep it precise.
Optional garnish – shaved dark chocolate: For an extra touch of elegance and a subtle bitter edge.
Everything's prepped? Good. Let’s get into the real action…
The Method — Step by Step
Preheat your oven to 350°F (175°C) and grease a 9‑inch round cake pan. While the oven warms, line the bottom with parchment paper—this ensures the cake releases cleanly and keeps the “dirt” from soaking into the pan. The moment the pan hits the heat, you’ll hear a faint “whoosh” as the metal expands, a good sign that the oven is truly ready.
In a large mixing bowl, whisk together the flour, sugar, cocoa powder, instant coffee granules, baking powder, baking soda, and salt. This dry blend should look uniformly dark, with no clumps—if you see any, sift it again. Power transition: this is the foundation, and a well‑combined dry mix prevents pockets of bitterness later.
Kitchen Hack: Add the instant coffee granules to the dry mix instead of the wet mix; this keeps the coffee flavor evenly distributed.In a separate bowl, whisk the melted butter, milk, eggs, and vanilla until smooth. The mixture should look glossy and slightly thick—if it looks watery, you’ve missed an ingredient or the butter isn’t fully melted.
Gradually pour the wet mixture into the dry ingredients, stirring with a rubber spatula until just combined. Over‑mixing will develop gluten, leading to a tough cake. Stop when you see a few streaks of flour; the batter should be thick but pourable.
Fold in the crushed Oreos gently, reserving a handful for the topping. The crumbs should be visible, creating a speckled “dirt” effect throughout the batter. This next part? Pure magic. The Oreo pieces will stay crunchy after baking, giving you that signature texture.
Kitchen Hack: Toss the crushed Oreos with a tiny pinch of flour before folding them in; this creates a barrier that keeps them from sinking.Pour the batter into the prepared pan, smoothing the top with a spatula. Sprinkle the reserved Oreo crumbs evenly over the surface; they’ll form a crunchy crust as the cake bakes.
Slide the pan into the oven and bake for 30‑35 minutes. The cake is done when a toothpick inserted into the center comes out with just a few moist crumbs—no wet batter.
Watch Out: Opening the oven door too early can cause the cake to collapse; trust the timer.While the cake cools, prepare the ganache. Heat the heavy cream in a saucepan until it just begins to simmer, then remove from heat and pour over the chocolate chips. Let it sit for a minute, then whisk until glossy and smooth. Stir in the strong espresso; the mixture should turn a deep, almost black, sheen.
Once the cake is completely cool, drizzle the ganache over the top, allowing it to cascade down the sides like a dark waterfall. Finally, dust the surface with cocoa powder and, if you like, garnish with shaved dark chocolate. The ganache should set within 15 minutes, forming a glossy crust that locks in moisture.
That's it — you did it. But hold on, I've got a few more tricks that'll take this to another level…
Insider Tricks for Flawless Results
The Temperature Rule Nobody Follows
Never bake a cake straight from the fridge. Let the batter sit at room temperature for 10 minutes before pouring it into the pan. This small pause lets the leavening agents activate evenly, giving you a higher rise and a more uniform crumb. A friend once tried to skip this step, and the cake came out dense, like a brownie that never got its chance to breathe.
Why Your Nose Knows Best
When the cake is baking, trust the scent. Around the 20‑minute mark, you’ll notice a rich, coffee‑chocolate aroma wafting through the kitchen. If the smell turns slightly bitter or burnt, the cake is likely over‑baking. Pull it out a couple of minutes early; the residual heat will finish the cooking without sacrificing texture.
The 5‑Minute Rest That Changes Everything
After removing the cake from the oven, let it rest in the pan for exactly five minutes before transferring it to a wire rack. This short rest lets the steam settle, preventing the cake from cracking and keeping the crumb moist. Skipping this step can cause the cake to crumble when you try to lift it, especially with the heavy ganache on top.
Ganache Timing is Everything
The ganache should be poured while it’s still warm but not scorching. If it’s too hot, it will seep through the cake and make the crumb soggy; too cool, and it will set too quickly, forming a hard shell. Aim for a temperature of about 120°F (49°C)—you can test with a kitchen thermometer or simply touch the surface; it should feel warm to the touch but not burn.
Final Dust for Visual Impact
Instead of sprinkling cocoa powder directly from the container, use a fine mesh sieve. This creates an even, airy dusting that looks like freshly fallen snow on a mountain of chocolate. A heavy hand will make the top look muddy; a light hand gives that professional finish.
Creative Twists and Variations
This recipe is a playground. Here are some of my favorite ways to switch things up:
Mint Mocha Madness
Add ½ tsp of peppermint extract to the batter and replace half the chocolate chips with white chocolate chips. The mint cuts through the richness, making it perfect for a holiday twist.
Nutty Crunch
Stir in ¼ cup of toasted, chopped hazelnuts into the batter and sprinkle extra hazelnut pieces on top of the ganache. The nutty oil amplifies the coffee notes and adds a buttery crunch.
Vegan Velvet
Swap the butter for coconut oil, use almond milk instead of dairy, and replace the eggs with a flax‑egg mixture (1 tbsp ground flaxseed + 3 tbsp water per egg). The result is a plant‑based version that still delivers that moist crumb.
Spicy Espresso
Incorporate a pinch of cayenne pepper into the dry mix and a dash of dark rum into the ganache. The subtle heat awakens the coffee flavor and adds an adult‑only surprise.
Layered Delight
Split the batter into two pans, bake separately, and then layer them with a thick spread of coffee‑flavored buttercream between. This creates a towering, multi‑layered cake that’s perfect for celebrations.
Storing and Bringing It Back to Life
Fridge Storage
Cover the cake loosely with plastic wrap or store it in an airtight container. It will stay fresh for up to 4 days. The ganache may firm up; let it sit at room temperature for 15 minutes before serving.
Freezer Friendly
Wrap the cooled cake tightly in a double layer of foil, then place it in a freezer‑safe bag. It freezes beautifully for up to 2 months. Thaw overnight in the fridge, then bring to room temperature before adding fresh ganache if needed.
Best Reheating Method
When you’re ready to serve leftovers, place a slice on a microwave‑safe plate, add a tiny splash (about 1 tsp) of water, and microwave on medium for 20‑30 seconds. The steam revives the crumb and the ganache softens back to a silky sheen.