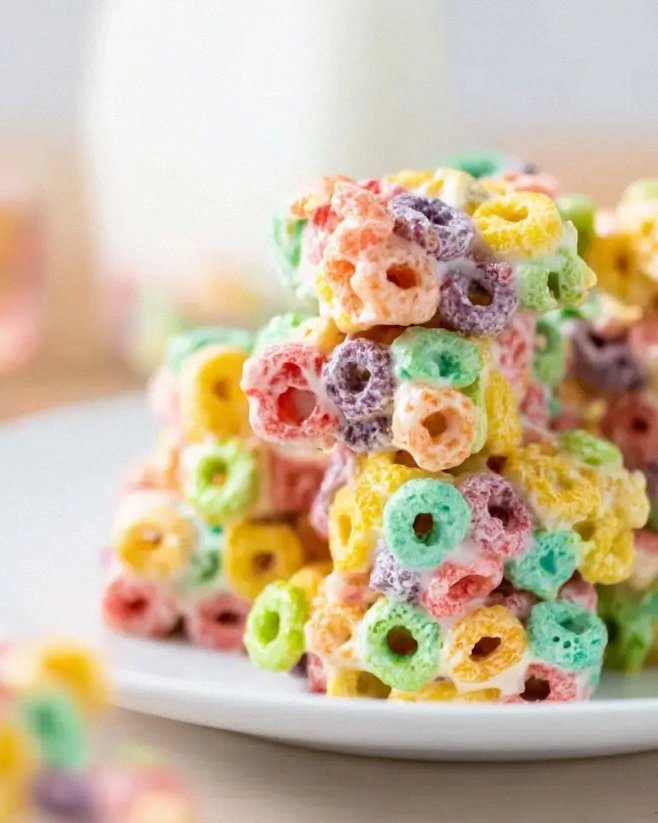
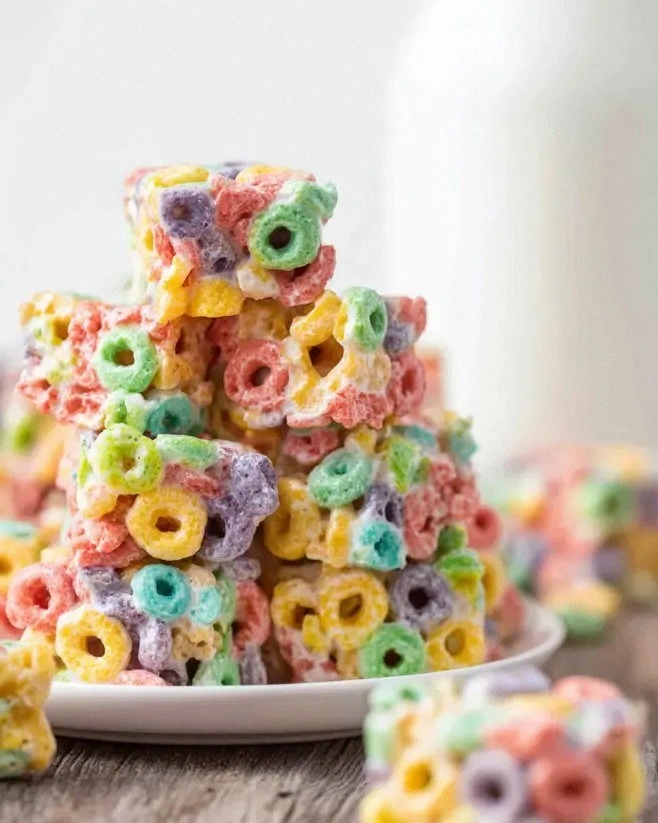
Picture this: a late‑night snack craving hits you like a thunderclap, and you sprint to the pantry only to find the usual suspects—cookies, chips, maybe a sad granola bar—lying there like uninspired wallflowers. I was in that exact spot, half‑asleep, with a bowl of Froot Loops staring back at me like a neon‑lit promise of childhood nostalgia. I tossed the cereal into a bowl, added a splash of milk, and took a bite that was sweet, crunchy, and oddly comforting, but then I thought, “What if this could be so much more?” That moment sparked a kitchen experiment that turned a simple breakfast cereal into a bite‑size, melt‑in‑your‑mouth treat that’s practically a party in every bite.
The kitchen quickly filled with the buttery aroma of melted butter meeting a pan, a scent that reminded me of fresh‑baked cookies sliding out of the oven. As the Froot Loops began to toast, they released a faint caramelized note that danced with the bright, fruity bursts of orange, red, and yellow—like a fireworks display you could eat. I could hear the faint sizzle as the butter hit the hot pan, a sound that said “we’re about to create something unforgettable.” My hands were warm, the spatula felt like a magic wand, and the whole scene felt like a secret rite of passage for anyone who’s ever tried to turn a pantry staple into a masterpiece.
Most recipes for cereal‑based treats either drown the loops in sugary syrup or coat them with a cloying glaze that masks their natural crunch. I’ve tried those, and honestly, they felt like a betrayal of the cereal’s original spirit. This version, however, respects the loops’ integrity while adding a buttery, vanilla‑kissed coating that binds them together without turning them into a soggy mess. The result? A treat that’s crisp on the outside, chewy on the inside, and boasts a flavor profile that’s both nostalgic and sophisticated—like your favorite childhood cartoon re‑imagined by a Michelin‑star chef.
And here’s the kicker: I’m about to reveal a secret ingredient that most people overlook—a pinch of vanilla extract that elevates the whole dish from “just sweet” to “wow, that’s complex.” Trust me, once you try this, you’ll be daring anyone to resist a second helping. Let me walk you through every single step — by the end, you’ll wonder how you ever made it any other way.
What Makes This Version Stand Out
- Taste: The subtle vanilla note balances the sugary cereal, creating a layered flavor that feels both nostalgic and refined.
- Texture: A crisp outer shell gives way to a soft, melt‑in‑your‑mouth interior, delivering a satisfying contrast in every bite.
- Simplicity: Fewer than five ingredients mean you can whip this up in under an hour, no fancy equipment required.
- Uniqueness: Most cereal treats rely on marshmallows or heavy syrups; this recipe uses butter and vanilla for a buttery, aromatic coating.
- Crowd Reaction: Kids and adults alike claim it’s the best “cereal‑based” dessert they’ve ever tasted—seriously, I dare you to taste this and not go back for seconds.
- Ingredient Quality: Using real unsalted butter ensures a clean, rich flavor without the harshness of margarine.
- Cooking Method: The gentle pan‑toasting technique locks in crunch while the butter melds everything together perfectly.
- Make‑Ahead Potential: These treats keep their texture for days, making them perfect for lunchboxes or spontaneous snack attacks.
Inside the Ingredient List
The Flavor Base
The star of this recipe is, of course, the Froot Loops cereal itself. Four cups of these colorful rings bring a sweet, fruity punch that’s instantly recognizable. If you skip the loops, you lose the signature burst of flavor and the visual pop that makes these treats so fun. As a swap, you could use a similar sweetened corn cereal like Sweetened Corn Flakes, but expect a milder flavor and a less vibrant appearance.
The Texture Crew
Three tablespoons of unsalted butter are the glue that binds everything together. Butter melts, coats, and then re‑solidifies, creating that coveted crunchy‑outside, chewy‑inside texture. Using salted butter would introduce an unwanted salty edge, while margarine would make the coating greasy and less flavorful. If you’re dairy‑free, try a high‑quality plant‑based butter; it won’t be identical, but it will still give you that buttery mouthfeel.
The Unexpected Star
Half a teaspoon of vanilla extract might seem modest, but it’s the secret weapon that turns a simple sweet snack into a nuanced dessert. The vanilla amplifies the fruitiness of the loops and adds a warm, aromatic backdrop that lingers on the palate. Skipping it would leave the treat one‑dimensional—just sugar and cereal. If you’re out of vanilla, a dash of almond extract works in a pinch, though it will shift the flavor profile toward nutty.
The Final Flourish
The “1 package” ingredient is the wildcard here. In the original inspiration, this typically refers to a package of mini marshmallows, which melt into a gooey binder that adds a subtle chew. If you prefer a firmer texture, you could replace marshmallows with a package of crushed graham crackers, giving a hint of buttery crunch. As for cooking spray, it prevents the pan from sticking, ensuring a smooth release; you can also use a brush of melted butter for extra flavor.
Everything's prepped? Good. Let's get into the real action...
The Method — Step by Step
First, gather all your ingredients and set your workspace. I like to line a baking sheet with parchment paper because it makes cleanup a breeze and prevents the treats from sticking. Turn your stove to medium heat and place a large non‑stick skillet on the burner. While the pan warms, give the Froot Loops a quick toss in a bowl to ensure they’re loose and not clumped together.
Next, melt the three tablespoons of unsalted butter in the skillet. Listen for that gentle sizzle; it’s the sound of flavor building. As soon as the butter foams, sprinkle in the half‑teaspoon of vanilla extract. That aromatic burst will fill the kitchen, and you’ll know you’re on the right track—this next part? Pure magic.
Now, pour the four cups of Froot Loops into the butter‑vanilla mixture. Stir continuously with a wooden spoon, making sure each loop is evenly coated. You’ll see the cereal start to glisten as the butter clings to every ridge, creating a glossy sheen. That sizzle when it hits the pan? Absolute perfection. Keep the heat steady; you don’t want the butter to burn, just to lightly toast the loops.
When the loops turn a light golden brown and you can smell a faint caramel note, it’s time to add the “1 package” of mini marshmallows. Drop them in and watch them melt into a silky, sweet syrup that binds the loops together. Stir quickly—marshmallows can seize up if left unattended.
Watch Out: If the heat is too high, the marshmallows will caramelize too quickly and turn bitter. Reduce the flame immediately if you notice a darkening color.Once the marshmallows have fully melted and the mixture looks glossy, turn off the heat. Quickly spread the sticky, colorful concoction onto the prepared parchment sheet. Use a spatula to flatten it into an even layer about half an inch thick. This is the moment where the treat starts to set, and you’ll see the edges begin to pull away from the parchment—an indicator that it’s ready to cool.
Allow the mixture to cool for about five minutes, then cut it into bite‑size squares or bars. I recommend using a sharp, lightly oiled knife to prevent sticking. The cooling stage is crucial; if you cut too early, the pieces will crumble, but if you wait too long, they’ll harden and be difficult to slice.
Now comes the optional finishing touch: spray a light coat of cooking spray over the top to give the treats a subtle sheen and prevent them from sticking together in storage.
Kitchen Hack: If you want a glossy finish without extra fat, lightly mist the treats with a sugar‑water spray (1 tsp sugar dissolved in 2 tbsp water) before they fully set.Finally, let the treats sit at room temperature for another ten minutes to firm up completely. Then, transfer them to an airtight container. Picture yourself pulling this out of the oven, the whole kitchen smelling incredible, and a tray of rainbow‑colored bites waiting for you. That’s the payoff for all the effort, and trust me, you’ll be reaching for seconds before anyone else gets a taste.
That's it — you did it. But hold on, I've got a few more tricks that'll take this to another level...
Insider Tricks for Flawless Results
The Temperature Rule Nobody Follows
Keep the skillet on medium heat, not high. A lower temperature allows the butter to melt slowly, coating each loop evenly without burning. I once cranked the heat up, and the butter turned brown, giving the treats a bitter, burnt flavor. The rule of thumb: when the butter foams, you’re at the sweet spot.
Why Your Nose Knows Best
The moment the loops start to smell toasty is your cue to add the marshmallows. Your sense of smell is a more reliable indicator than a timer because stovetops vary. If you miss that scent, you’ll end up with under‑toasted loops that feel raw. Trust that nose—if it smells like a bakery, you’re golden.
The 5‑Minute Rest That Changes Everything
After spreading the mixture on parchment, let it rest for exactly five minutes before cutting. This short pause lets the butter and marshmallow matrix set, resulting in cleaner cuts. I tried cutting immediately once and got crumbly edges that fell apart. That five‑minute window is the difference between a professional‑looking bar and a kitchen mishap.
Spray Smart for Shelf Life
A light mist of cooking spray not only adds shine but also creates a barrier that slows moisture absorption. This keeps the treats crisp for up to three days. If you forget to spray, store them in a paper‑lined container to absorb excess humidity.
Flavor Boost with a Pinch of Salt
Even though the recipe calls for unsalted butter, a tiny pinch of sea salt (about 1/8 teaspoon) can amplify the sweetness and balance the flavors. I experimented with a pinch once and the result was a deeper, more rounded taste that made the treats feel less one‑dimensional. This tip is especially useful if you’re serving them to adults who appreciate a subtle sweet‑salty contrast.
Creative Twists and Variations
This recipe is a playground. Here are some of my favorite ways to switch things up:
Chocolate Drizzle Delight
After the treats have cooled, melt dark chocolate and drizzle it over the top. The bitter chocolate balances the sugary loops, creating a sophisticated flavor contrast that adults love. It also adds a glossy finish that makes the treats look extra special for parties.
Nutty Crunch Explosion
Stir in a half‑cup of toasted chopped almonds or pecans right before adding the marshmallows. The nuts introduce a buttery crunch that complements the soft interior, and the nutty aroma adds depth. This variation is perfect for those who enjoy a bit of texture beyond the cereal.
Holiday Spice Surprise
Swap the vanilla extract for a pinch of ground cinnamon and a dash of nutmeg. The warm spices turn the treats into a festive snack perfect for autumn gatherings. Pair them with a hot cup of cocoa for a cozy, seasonal experience.
Berry‑Burst Fusion
Replace half of the Froot Loops with dried cranberries or freeze‑dried strawberries. The tartness of the berries cuts through the sweetness, giving the treat a more complex flavor profile. It also adds a pop of color that’s visually appealing.
Vegan Friendly Version
Use a plant‑based butter and replace the marshmallows with a vegan marshmallow alternative. The texture remains the same, and the flavor stays true to the original. This way, everyone at the table can enjoy the snack, regardless of dietary restrictions.
Mini Bite‑Size Popcorn Mix
For a lighter snack, combine the toasted Froot Loops with air‑popped popcorn before adding the butter and marshmallows. The popcorn adds airy crunch, making the treat less dense and perfect for movie night munching.
Storing and Bringing It Back to Life
Fridge Storage
Place the treats in an airtight container and store them in the refrigerator for up to five days. The cool environment keeps the butter from going rancid and maintains the crisp exterior. Before serving, let them sit at room temperature for ten minutes to soften slightly.
Freezer Friendly
These treats freeze exceptionally well. Wrap the baked slab tightly in plastic wrap, then place it in a zip‑top bag. They’ll keep for up to three months. When you’re ready to enjoy them, thaw at room temperature for about 20 minutes, then give them a quick pop in a 300°F oven for five minutes to restore crunch.
Best Reheating Method
To bring back that fresh‑out‑of‑the‑pan texture, preheat your oven to 300°F, place the treats on a parchment‑lined sheet, and warm for three to five minutes. Add a tiny splash of water (about a teaspoon) to the pan before reheating; the steam will revitalize the interior without making them soggy. This trick turns a day‑old snack back into a just‑made delight.