I’ll be honest — I ate half the batch before anyone else got to try it, and that’s because this cake is nothing short of a revelation. It all started on a rainy Tuesday when my roommate dared me to turn a plain angel food cake into something that could make the heavens jealous. I stared at that fluffy, cloud‑like base and thought, “What if I turned this into a dessert that sings and dances on the tongue?” The answer was a whirlwind of cherry pie filling, silky vanilla pudding, and a crown of toasted almonds that crackled like fireworks. That night, the kitchen smelled like a bakery on a sugar high, the oven hummed a comforting lullaby, and my heart raced faster than a whisk on high speed.
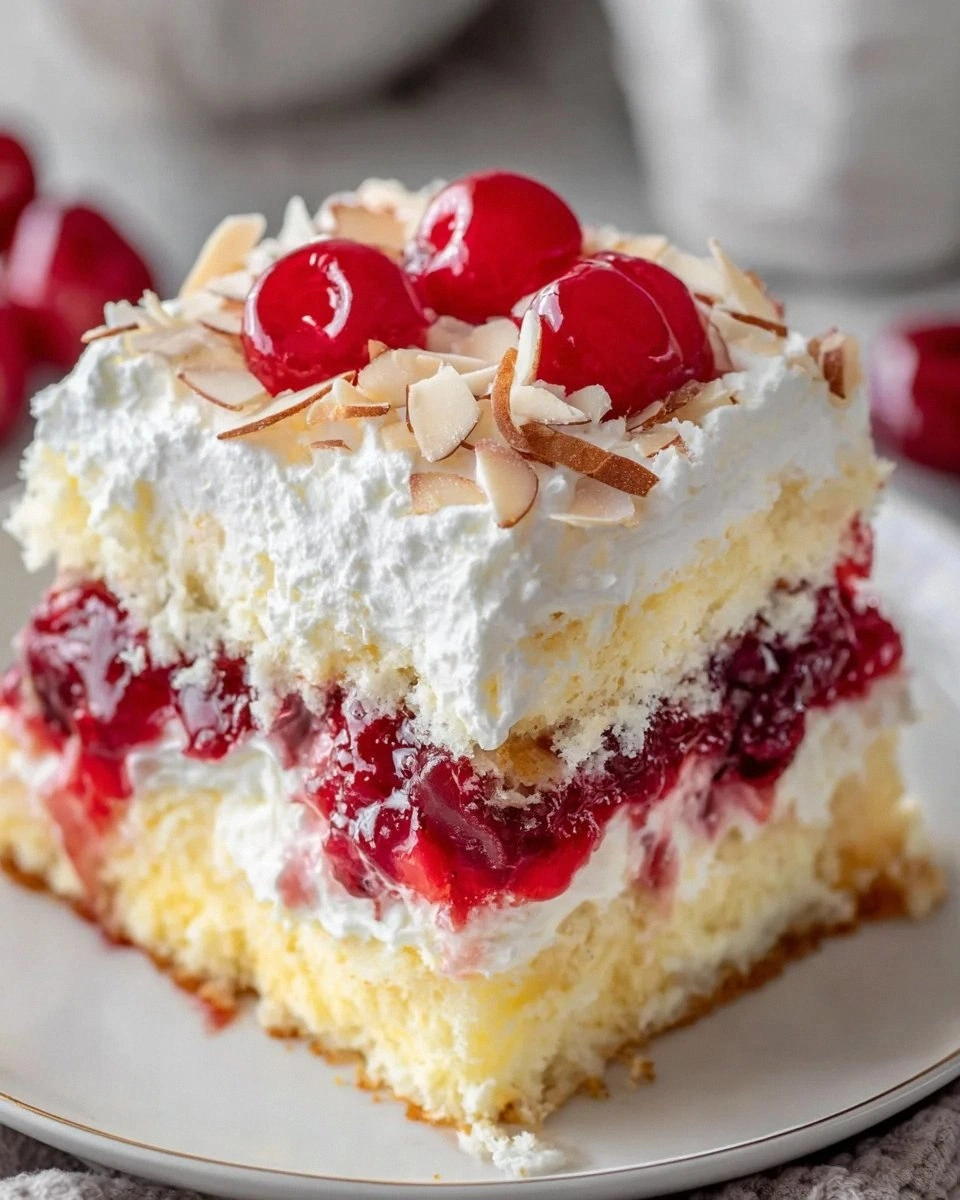
Picture yourself pulling this out of the oven, the whole kitchen smelling incredible, the cherry glaze glistening like sunrise on a lake. The first bite is a symphony: the airy angel cake cradles a velvety pudding that’s as smooth as satin, while the cherry burst adds a tart pop that makes your taste buds do a happy dance. The whipped topping floats on top like a cloud, and the almonds? They’re the crisp punctuation at the end of a perfect sentence. I dare you to taste this and not go back for seconds; the layers are so balanced you’ll swear they were handcrafted by angels.
Most recipes get this completely wrong. They either drown the delicate cake in a swamp of sauce, or they skimp on the creamy middle, leaving you with a dry, forgettable dessert. Here’s what actually works: a light, airy cake that stays fluffy, a pudding that sets just enough to hold together without turning rubbery, and a fruit filling that’s sweet‑tart, not cloying. The secret? A few minutes of patience, a dash of confidence, and the right balance of dairy and fruit. I’m not just talking about a good recipe; I’m talking about a game‑changer that will have you bragging at every dinner party.
Okay, ready for the game‑changer? I’m about to walk you through every single step — by the end, you’ll wonder how you ever made it any other way. We’ll start with the basics, dive into the science of texture, and finish with a few pro tips that will elevate this cake from “delicious” to “legendary.” Stay with me here — this is worth it.
What Makes This Version Stand Out
- Texture: The angel food cake stays feather‑light because we never fold in heavy liquids; the pudding adds a silk‑smooth contrast without weighing it down.
- Flavor Balance: Sweet, tart, and creamy mingle perfectly, thanks to the cherry filling’s acidity and the vanilla pudding’s mellow sweetness.
- Simplicity: No complicated frosting, no tempering chocolate — just mix, layer, and chill. You can pull this together in under an hour.
- Make‑Ahead Power: Assemble the night before, pop it in the fridge, and you’ll have a show‑stopping dessert ready for brunch or dinner.
- Visual Wow Factor: The glossy cherry glaze and almond garnish create a restaurant‑quality presentation with zero plating drama.
- Ingredient Quality: Using a high‑quality angel food cake and real cherry pie filling makes all the difference; shortcuts feel like shortcuts, not shortcuts.
- Crowd Reaction: People who try this often claim it’s “the best cake they’ve ever had” and ask for the recipe twice.
- Versatility: Swap cherry for blueberry, or almond for pistachio — the base holds up to any flavor you dream up.
Inside the Ingredient List
The Flavor Base
The cherry pie filling is the heart‑beat of this cake. Its sweet‑tart profile cuts through the richness of the pudding, creating a bright contrast that awakens the palate. If you skip it, you’ll lose that burst of fruitiness that makes each bite feel like a celebration. Feel free to substitute with blueberry or peach if cherries aren’t your jam — just make sure the filling isn’t overly watery, or the cake will become soggy.
The Texture Crew
Angel food cake is the unsung hero here. Its airy crumb provides a sturdy yet light foundation that can hold the pudding without collapsing. When buying, look for a cake that’s fresh and not overly dry; a stale cake will absorb too much moisture and turn mushy. If you can’t find a store‑bought one, you can whip up a quick homemade version — just remember to fold the egg whites gently to keep the structure airy.
The instant French vanilla pudding mix does the heavy lifting for the creamy layer. It thickens the milk and cream mixture, giving it that custard‑like body without the need for constant stirring on the stove. If you can’t locate the French version, a regular vanilla pudding mix works just as well, but the French version adds a subtle, buttery depth that makes the pudding sing.
The Unexpected Star
Whole milk and heavy cream combine to create a dreamy base for the pudding. The milk provides the body, while the cream adds richness that feels indulgent without being cloying. For dairy‑free friends, almond or oat milk can replace the whole milk, and coconut cream can stand in for heavy cream — just expect a faint coconut aroma that pairs nicely with cherries.
Sour cream brings a gentle tang that cuts through the sweetness, preventing the dessert from feeling overly sugary. It also adds a velvety texture that makes each spoonful feel luxurious. Greek yogurt is a healthy swap that still delivers that tangy punch, though it will make the pudding slightly thicker.
The Final Flourish
Whipped topping crowns the cake with a cloud‑like finish, adding a light, airy layer that balances the denser pudding underneath. If you’re feeling ambitious, whip your own heavy cream with a pinch of sugar and a splash of vanilla — the flavor will be unbeatable. Thinly sliced almonds are the crunchy surprise that adds texture and a nutty note, turning each bite into a multi‑dimensional experience. Swap them for toasted pecans if you prefer a deeper, buttery crunch.
Everything's prepped? Good. Let's get into the real action…
The Method — Step by Step
First, gather all your ingredients and give the angel food cake a quick visual inspection. If it looks dry around the edges, lightly brush the top with a tablespoon of whole milk — this prevents the cake from soaking up too much liquid later. Place the cake on a sturdy cake board or a deep plate; this will be your canvas. Power transition: Okay, ready for the game‑changer?
In a medium saucepan, combine 1 cup of whole milk, 1 cup of heavy cream, and the packet of instant French vanilla pudding mix. Whisk vigorously until the mix dissolves completely, then bring to a gentle boil over medium heat. Once you see tiny bubbles forming at the edges, reduce the heat and let it simmer for 2 minutes. The mixture should thicken to a custard‑like consistency that coats the back of a spoon. Watch Out: If it boils too vigorously, it can curdle, ruining the silky texture.
Stir the sour cream into the warm pudding until fully incorporated, then let the mixture cool to room temperature. To speed up cooling, set the bowl over an ice bath and stir occasionally. The pudding should become glossy and smooth, resembling a thick sauce that’s still pourable. This is the moment of truth — the pudding must be cool enough that it won’t melt the angel cake when you pour it.
Now, take your cherry pie filling and spread an even layer over the top of the angel cake, about 1/3 inch thick. Use a rubber spatula to smooth it out, making sure the edges are sealed so the pudding won’t leak out. The cherry’s bright red hue creates a visual contrast that’s as pleasing to the eye as it is to the palate.
Gently pour the cooled vanilla pudding over the cherry layer, allowing it to cascade down the sides of the cake. Use a gentle rocking motion to distribute the pudding evenly; you’ll hear a soft “whoosh” as it settles. The pudding should coat the cake like velvet, forming a glossy veil that sets the stage for the final toppings.
While the pudding is still slightly soft, dollop the whipped topping over the surface, using a piping bag or a large spoon. Spread it in a circular motion, leaving a slight peak in the center for dramatic effect. The whipped topping should sit like a cloud, its airy texture contrasting the dense pudding underneath.
Finally, sprinkle the thinly sliced almonds evenly across the whipped topping. The almonds should be toasted just enough to release their nutty aroma but still retain a gentle crunch. If you like extra sweetness, drizzle a thin ribbon of honey or maple syrup over the almonds — this adds a glossy finish and a subtle caramel note.
Transfer the assembled cake to the refrigerator and let it chill for at least 30 minutes, preferably an hour. This resting period allows the pudding to set, the flavors to meld, and the cake to absorb just enough moisture for a perfect bite. When you’re ready to serve, run a thin knife around the edge of the plate to release any stuck crumbs, then slice with a hot, wet knife for clean cuts.
That’s it — you did it. But hold on, I’ve got a few more tricks that'll take this to another level. Keep reading for insider tips that will make every slice look and taste like it was crafted by a pastry chef on a cloud.
Insider Tricks for Flawless Results
The Temperature Rule Nobody Follows
Never pour hot pudding over a cold cake; the sudden temperature shock can cause the cake to collapse or become soggy. Let the pudding cool to room temperature, or even chill it briefly, before you pour. I once tried to speed things up by pouring warm pudding directly, and the cake turned into a mushy pancake. Trust the rule, and your layers will stay distinct.
Why Your Nose Knows Best
Your sense of smell is a secret weapon in baking. When the pudding is simmering, you’ll notice a sweet vanilla aroma that signals it’s thickening correctly. If you smell a burnt or overly milky scent, you’ve likely over‑cooked it. Use your nose as a thermometer; it’s more reliable than any kitchen gadget.
The 5‑Minute Rest That Changes Everything
After assembling, let the cake rest uncovered for five minutes before covering it with plastic wrap. This tiny window allows the surface moisture to evaporate slightly, preventing a gummy top. I once covered it immediately, and the whipped topping turned soggy within minutes. Those five minutes are a small price to pay for a crisp, airy finish.
Almond Toasting Secrets
A quick toast in a dry skillet over medium heat for just 2 minutes brings out the almond’s natural oils, creating a deeper, richer flavor. Keep the almonds moving; they can go from golden to burnt in a heartbeat. The toasted almonds add a buttery crunch that makes the cake unforgettable.
Pudding Consistency Check
When the pudding reaches the “coating the back of a spoon” stage, run your finger through the sauce; the line should stay clear for a second before the sauce slides back together. This visual cue is the hallmark of perfect thickening. If it’s too runny, keep simmering for another minute; if it’s too thick, whisk in a splash of milk.
Creative Twists and Variations
This recipe is a playground. Here are some of my favorite ways to switch things up:
Berry Bliss
Swap the cherry pie filling for a mixed‑berry compote (strawberries, raspberries, blueberries). The tartness of the berries pairs beautifully with the vanilla pudding, and the colors create a rainbow effect that’s perfect for summer gatherings.
Chocolate Dream
Add a layer of chocolate ganache between the pudding and whipped topping. Melt dark chocolate with a splash of cream, let it set slightly, then drizzle over the whipped topping. Chocolate lovers will thank you, and the bitterness balances the sweetness.
Nutty Coconut
Replace the sliced almonds with toasted coconut flakes and a drizzle of coconut milk‑based whipped topping. This tropical twist gives the cake an island vibe, perfect for a beach‑themed party.
Coffee Kick
Mix a tablespoon of espresso powder into the vanilla pudding mix before cooking. The subtle coffee undertone adds depth, making the dessert a great after‑dinner treat for adults.
Spiced Autumn
Fold a pinch of ground cinnamon and nutmeg into the pudding, and use an apple‑cinnamon filling instead of cherry. This variation feels cozy and is ideal for a chilly fall evening.
Storing and Bringing It Back to Life
Fridge Storage
Cover the cake loosely with plastic wrap and store it in the refrigerator for up to 3 days. The pudding will continue to set, and the whipped topping will stay fluffy as long as it’s not pressed too hard.
Freezer Friendly
If you need to keep it longer, freeze the assembled cake (without the whipped topping) for up to 1 month. Wrap it tightly in freezer‑safe film, then a layer of foil. When ready to serve, thaw in the fridge overnight, add fresh whipped topping, and sprinkle almonds.
Best Reheating Method
To revive a refrigerated slice, place it on a microwave‑safe plate, add a tiny splash of milk (about a teaspoon), and microwave on low for 15‑20 seconds. The added moisture steams the cake back to its original fluffiness without making it soggy.