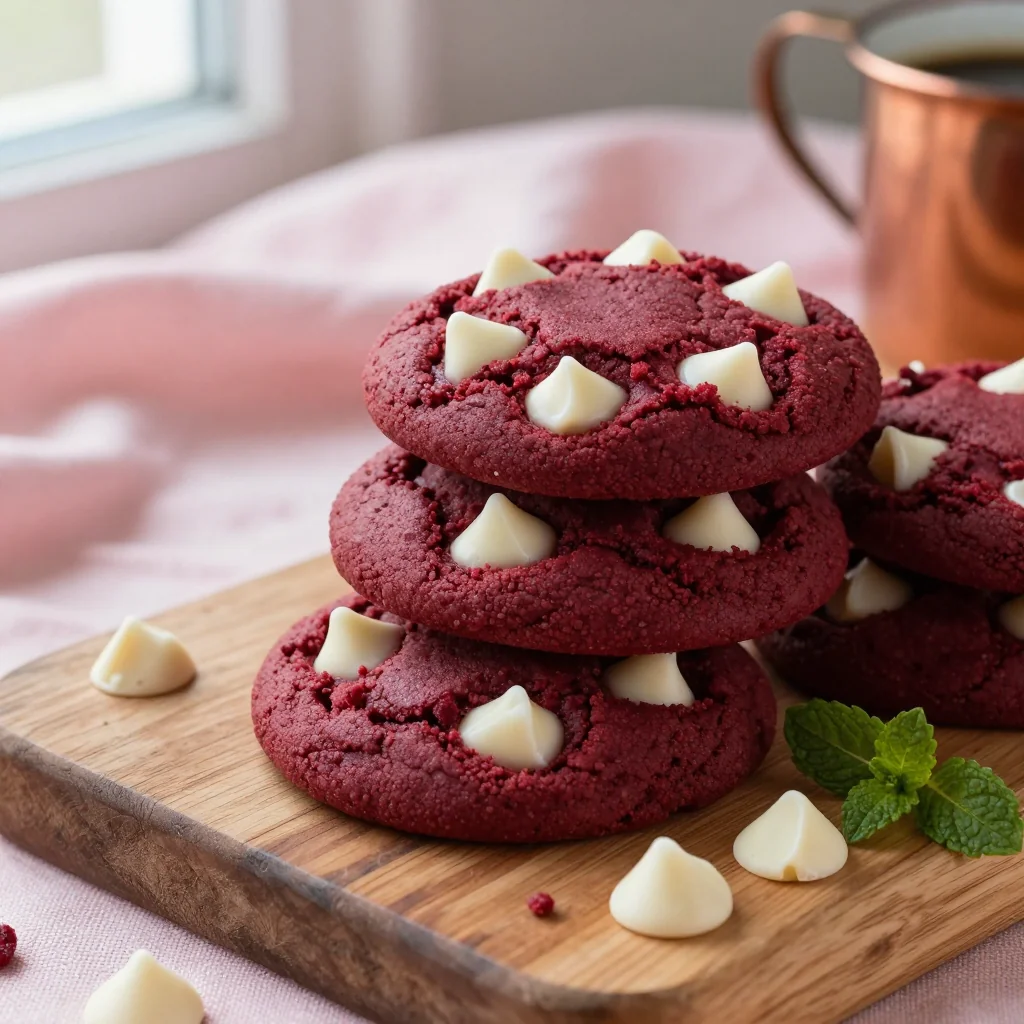
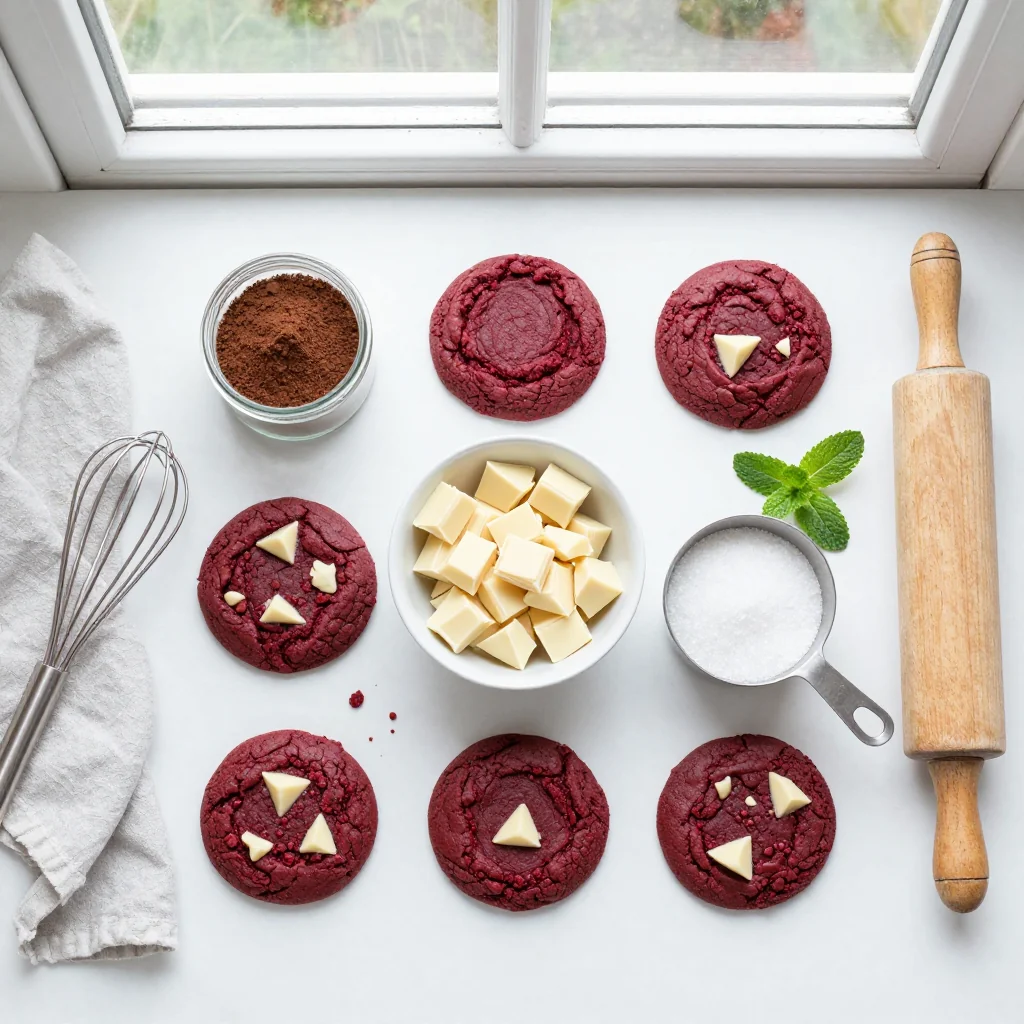
The first time I tasted a red‑velvet treat, it was at a bustling street market in New Orleans, where the scent of cocoa mingled with the faint tang of buttermilk. The ruby‑red hue caught my eye, but it was the soft, buttery crumb that stole my heart. I spent weeks experimenting, tweaking the balance of sugar and cocoa, until the perfect cookie emerged—soft in the center, slightly crisp at the edges, and speckled with luxurious white chocolate chunks that melt like clouds on the tongue.
Red velvet, originally a humble Southern cake, has traveled far beyond its roots, becoming a symbol of celebration and comfort. By turning it into a handheld cookie, we preserve that festive spirit while adding a portable, snack‑ready format that’s perfect for any occasion—whether it’s a casual brunch or an elegant tea party.
In this guide, you’ll learn how to achieve that signature deep‑red color without artificial dyes, how to incorporate white chocolate for a perfect contrast, and why each step—from creaming the butter to chilling the dough—makes a measurable difference in texture and flavor.
I’m thrilled to share this recipe with you, and I promise that with a few simple techniques, you’ll create cookies that look as stunning as they taste. Let’s dive in and bring a splash of color to your baking repertoire!
🌟 Why This Recipe Will Capture Your Heart
Red Velvet Cookies combine visual drama with comforting flavors, making them a crowd‑pleaser for any gathering.
- ✨ Striking Color Without Overwhelming Artificial Additives: Using a modest amount of natural beet powder and cocoa creates a deep crimson hue that’s both vibrant and wholesome.
- ✨ Perfect Balance of Sweetness and Tang: The buttermilk and a splash of vinegar give the dough a subtle tang that cuts through the sweetness, keeping the palate refreshed.
- ✨ Creamy White Chocolate Chunks: The white chocolate adds a buttery richness that contrasts beautifully with the cocoa‑infused base.
- ✨ Soft‑Chewy Texture: By chilling the dough and baking at a precise temperature, the cookies stay soft in the middle while developing a delicate crust.
- ✨ Versatile Serving Options: Serve them warm with a glass of milk, or pair with a light raspberry coulis for an elegant dessert.
- ✨ Simple Ingredient List: All items are pantry‑friendly, making this recipe accessible for both beginners and seasoned bakers.
🥗 The Ingredients
📝 Complete Ingredient List
For the Cookie Dough:
For the White Chocolate Chunks:
Optional Cream Cheese Glaze (for an extra touch of indulgence):
🔍 Focus on Key Ingredients
All‑Purpose Flour
Flour provides the structural backbone of the cookie. Using a moderate protein flour (around 10‑11%) ensures a tender crumb while still allowing the cookies to hold their shape during baking. For an extra light texture, sift the flour with cocoa powder before mixing.
Beet Powder (Natural Red Food Coloring)
Instead of relying on synthetic dyes, beet powder imparts a deep, natural red hue and adds a subtle earthy undertone that complements the cocoa. Use a gel‑based food coloring if you prefer a more intense shade; just reduce the amount of liquid in the recipe accordingly.
White Chocolate Chunks
High‑quality white chocolate contains real cocoa butter, which melts smoothly and gives a creamy bite. Chopping the chocolate into generous chunks ensures pockets of molten sweetness throughout each bite, creating a delightful contrast with the slightly tart cookie base.
🔄 Quick Substitutions
| If you don’t have... | Use instead... |
|---|---|
| Buttermilk | 1 cup milk + 1 tbsp lemon juice (let sit 5 min) |
| White chocolate | Milk chocolate or dark chocolate (adjust sweetness) |
| Beet powder | Red gel food coloring (use sparingly) |
👨🍳 Step‑by‑Step Instructions
Follow these detailed steps to ensure perfect texture, color, and flavor. Each phase builds on the previous one, so take your time and enjoy the process.
📋 Phase 1: Preparation & Mise en Place
Gather, measure, and pre‑heat before you begin.
Preheat the oven and line baking sheets
Set your oven to 175°C (350°F) and allow it to fully preheat. While the oven warms, line two large baking sheets with parchment paper or silicone mats. This prevents sticking and ensures even browning.
Combine dry ingredients
In a medium bowl, whisk together the sifted flour, cocoa powder, baking soda, and fine sea salt. Sifting aerates the mixture, preventing lumps and ensuring a uniform color throughout the dough.
🔥 Phase 2: Creaming & Mixing
Create a smooth, glossy batter that traps air for lift.
Cream butter and sugars
Using a stand mixer on medium speed, beat the softened butter, granulated sugar, and brown sugar together for 3‑4 minutes, until the mixture is light, fluffy, and pale yellow. This process dissolves sugar crystals, contributing to a tender crumb.
Add egg, vanilla, and acidic components
Beat in the egg, vanilla extract, buttermilk, red food coloring, and white vinegar. The acidity from vinegar reacts with baking soda, creating a subtle lift and contributing to the characteristic soft interior.
Incorporate dry ingredients
Reduce the mixer speed to low and gradually add the dry ingredient mixture, scraping the sides of the bowl as needed. Mix until just combined; over‑mixing will develop gluten, making the cookies tough.
Fold in white chocolate chunks
Using a spatula, gently fold the chopped white chocolate chunks into the dough, ensuring even distribution without crushing the pieces. The chunks should remain visible in the final cookie.
✨ Phase 3: Baking, Finishing & Serving
From oven to plate, the final transformation.
Portion the dough
Using a cookie scoop (about 2 tbsp), drop rounded balls onto the prepared baking sheets, spacing them 2 inches apart. For uniform size, chill the dough for 15 minutes before scooping; this prevents excessive spreading.
Bake until set
Bake for 12‑14 minutes, or until the edges are set and the tops appear slightly cracked. The centers will still look soft; they will firm up as they cool.
Cool and optionally glaze
Allow the cookies to cool on the sheet for 5 minutes before transferring to a wire rack. If you’ve prepared the optional cream cheese glaze, drizzle or pipe a thin layer over each warm cookie for an extra layer of richness.
Serve and store
Serve the cookies at room temperature with a glass of cold milk, a cup of coffee, or a glass of sparkling rosé. Store leftovers in an airtight container for up to 5 days, or freeze for longer keeping.
💡 Expert Tips & Tricks
🛒 Choosing the Best Ingredients
Opt for European‑style butter, which contains about 82% butterfat; this yields a richer flavor and a more tender crumb. When selecting white chocolate, look for a product with at least 30% cocoa butter and minimal vegetable oil. Fresh, high‑quality beet powder or gel color will give a vivid hue without a bitter aftertaste.
🔪 Preparation Techniques
Cream the butter and sugars until the mixture reaches ribbon stage; this incorporates air, giving the cookies a slight lift. Always sift dry ingredients to avoid pockets of cocoa or flour that could create uneven texture. Chill the dough for at least 15 minutes; this solidifies the fat, controlling spread.
🌡️ Mastering the Baking Process
Preheat the oven fully; an under‑heated oven can cause cookies to spread excessively. Use an oven thermometer to verify the temperature. Rotate the baking sheets halfway through the bake to ensure even browning, especially if your oven has hot spots.
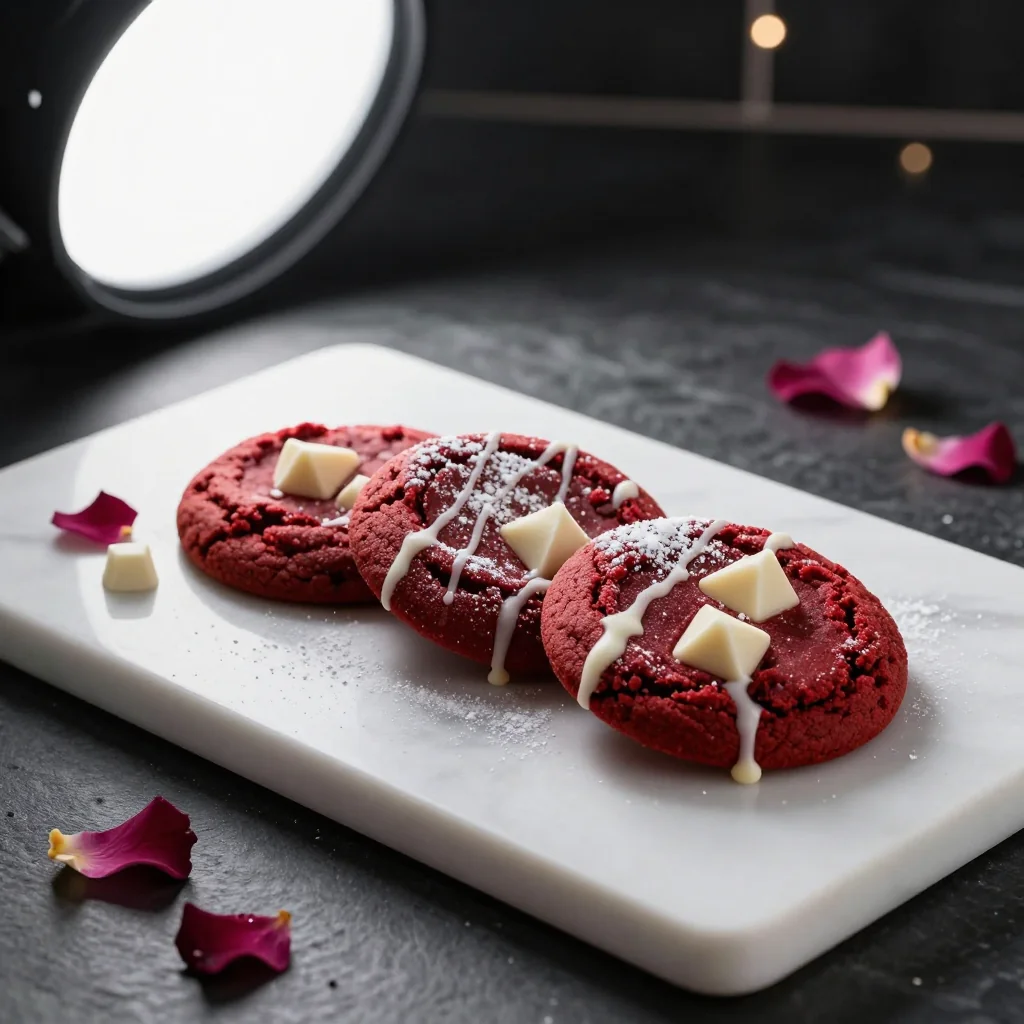
🍽️ Presentation & Service
For a polished look, drizzle a thin line of cream cheese glaze across the top of each cookie and sprinkle a pinch of edible gold dust. Serve on a marble slab or a rustic wooden board for visual contrast. Pair with a light berry compote for a burst of acidity that cuts through the richness.
🏆 Pro‑Level Secrets
Elevate your cookies from great to unforgettable with these professional techniques.
- 🎯 Temperature‑Controlled Butter: Soften butter to exactly 20°C (68°F). Butter that’s too warm will cause the dough to become greasy, while butter that’s too cold won’t cream properly, leading to dense cookies.
- 🎯 Precise Acid‑Base Balance: The combination of vinegar and baking soda creates carbon dioxide bubbles that subtly lift the dough. Too much acid will make the cookies taste sour; the 5 ml ratio is scientifically optimal for the 12‑cookie batch.
- 🎯 Controlled Spread Using Chilling: After forming the dough balls, chill them for 20‑30 minutes. The solidified fat prevents rapid spread, resulting in a taller, softer cookie with a crisp edge.
- 🎯 Even Color Distribution: Mix the red food coloring with a tablespoon of the buttermilk before adding it to the batter. This ensures the pigment is fully dissolved, avoiding streaks.
- 🎯 Glaze Consistency: For a glossy glaze, whisk the cream cheese until smooth, then gradually add powdered sugar until the mixture reaches a pourable consistency. Adding a splash of milk at the end prevents clumping.
- 🎯 Storage Science: Place a slice of bread in the container with the cookies; the bread releases moisture, keeping the cookies soft for up to a week without becoming soggy.
“A great cookie is a balance of texture, flavor, and visual appeal—master these, and you’ve unlocked a timeless classic.” — Jacques Pépin
🔄 Variations & Adaptations
The base recipe is versatile; here are several ways to tailor it to dietary needs, flavor preferences, or seasonal themes.
🥬 Vegetarian / Vegan Version
Replace the egg with a flax‑egg (1 tbsp ground flaxseed mixed with 3 tbsp water, let sit 5 min). Swap butter for a vegan butter or coconut oil, and use a plant‑based white chocolate. The texture remains soft, while the flavor stays true to the original.
- Flax‑egg: Provides binding and a subtle nutty note.
- Vegan butter: Choose a high‑fat variety for richness.
- Vegan white chocolate: Look for brands using cocoa butter, not palm oil.
🌶️ Flavor Twists
Experiment with complementary flavors to create a unique palate experience.
Spicy Chili‑Chocolate Version
Add ½ tsp cayenne pepper to the dry mix and substitute half of the white chocolate with dark chocolate chips. The heat accentuates the cocoa while the dark chocolate adds depth.
Mediterranean Olive‑And‑Feta Twist
Fold in ¼ cup finely chopped Kalamata olives and ¼ cup crumbled feta cheese. The salty brine balances the sweet base, creating a sophisticated appetizer cookie.
Asian Matcha‑White Chocolate Fusion
Replace cocoa powder with 2 tbsp matcha powder and keep the white chocolate chunks. The earthy green tea flavor pairs beautifully with the buttery dough.
⚠️ Dietary Adjustments
Gluten‑Free
Use a 1‑to‑1 gluten‑free flour blend (e.g., rice flour, tapioca starch, and potato starch) and add 1 tsp xanthan gum to mimic gluten’s elasticity.
Lactose‑Free
Substitute butter with lactose‑free margarine and use dairy‑free white chocolate. Ensure the cream cheese glaze uses a lactose‑free cream cheese alternative.
Low‑Calorie
Reduce sugar by 25% and replace half of the butter with unsweetened applesauce. Use dark chocolate chunks (70% cacao) for a richer flavor with less sugar.
👶 Kid‑Friendly Version
For younger palates, omit the beet powder and use a natural pink food coloring. Replace white chocolate chunks with mini chocolate chips to avoid choking hazards. Serve with a side of fresh strawberries for added fun.
📦 Storage & Reheating
🧊 Conservation
In the Refrigerator:
- Duration: 5 days
- Recommended container: airtight glass jar
- Tip: Place a slice of fresh bread on top to retain moisture.
In the Freezer:
- Duration: 3 months
- Method: Freeze baked cookies on a tray, then transfer to a zip‑lock bag.
- Defrosting: Move to the refrigerator overnight or microwave for 10 seconds.
💡 For optimal flavor, allow frozen cookies to return to room temperature before serving; this revives the soft interior.
♨️ Reheating
🔥 Oven (Recommended):
- Preheat to 150°C (300°F).
- Place cookies on a baking sheet, cover loosely with foil.
- Heat for 5‑7 minutes.
- Remove foil and warm for an additional 2 minutes for a crisp edge.
⚡ Microwave (Quick):
- Place a cookie on a microwave‑safe plate.
- Cover with a microwave‑safe lid.
- Heat on medium power for 15‑20 seconds.
- Check and repeat in 5‑second bursts if needed.
🍳 Skillet:
Heat a non‑stick skillet over low heat, add a teaspoon of butter, and warm the cookie for 30 seconds per side. This method restores a slight crispness without drying the interior.
🍷 Perfect Pairings
🥗 Accompaniments
- Fresh Berry Salad: A mix of strawberries, blueberries, and mint adds bright acidity that balances the sweet richness.
- Light Citrus Yogurt Dip: Greek yogurt blended with lemon zest and honey offers a tangy contrast.
- Roasted Almonds: The nutty crunch complements the soft cookie texture.
🍷 Wine & Beverage Pairings
- Rosé Champagne: Its crisp bubbles and subtle fruit notes lift the sweetness of the cookie.
- Late‑Harvest Riesling: The honeyed profile mirrors the white chocolate while providing acidity.
- Non‑Alcoholic Option: Sparkling raspberry water with a splash of lime.
🍰 To Complete the Meal
Begin with a light citrus sorbet or a chilled cucumber gazpacho as a starter. Follow the cookies with a silky vanilla panna cotta topped with a raspberry coulis for a harmonious dessert progression.
❓ Frequently Asked Questions
Q: Can I use a different type of chocolate instead of white chocolate?
Absolutely! Dark chocolate (70% cacao) will give a richer, slightly bitter contrast, while milk chocolate adds extra sweetness. Adjust the amount if you prefer a milder flavor; remember that darker chocolate may require a bit more sugar in the dough to maintain balance.
Q: Why does the dough feel sticky after mixing?
The combination of butter, sugars, and buttermilk creates a moist dough. This stickiness is normal and helps produce a chewy texture. If the dough is too soft to handle, chill it for 15‑20 minutes; the fat will firm up, making it easier to scoop.
Q: How can I make the cookies more fluffy?
Increase the amount of baking soda by ½ tsp and ensure the vinegar is fresh. Also, beat the butter and sugars until they reach a light, airy ribbon stage. Finally, avoid over‑mixing after adding the dry ingredients, as excess gluten development can make cookies dense.
Q: My cookies spread too much—what went wrong?
Over‑softened butter, insufficient chilling, or an under‑preheated oven can cause excess spread. Use butter at 20°C, chill the dough before baking, and always preheat the oven fully. Adding a tablespoon of cornstarch to the dry mix can also help absorb excess moisture.
Q: Can I freeze the dough before baking?
Yes! Shape the dough into balls, place them on a parchment‑lined tray, freeze solid, then transfer to a zip‑lock bag. Bake directly from frozen, adding an extra 2‑3 minutes to the baking time.
Q: How far in advance can I prepare the glaze?
The cream cheese glaze can be made up to 2 days ahead. Store it in an airtight container in the refrigerator. Before using, give it a quick stir to restore its smooth consistency.
🎉 To Your Oven!
This Red Velvet Cookie recipe is a celebration of color, texture, and indulgence. By mastering the balance of tangy buttermilk, deep red hue, and melt‑in‑your‑mouth white chocolate, you’ll create a treat that dazzles both the eyes and the palate. Whether you serve them at a holiday gathering, a casual brunch, or simply as an after‑dinner treat, these cookies are sure to become a beloved staple in your kitchen.
I encourage you to experiment with the variations, share your own twists, and let the aroma of fresh‑baked cookies fill your home. Your feedback fuels my culinary adventures, so please leave a comment, rate the recipe, and tag your photos with #VelvetChunkDelight on Instagram for a chance to be featured.
Have you tried this recipe?
Leave a comment and rating below! Share your photos on Instagram with #VelvetChunkDelight to be showcased.
Red Velvet Cookies with White Chocolate Chunks
Ruby‑red, soft‑chewy cookies studded with creamy white chocolate – a perfect blend of visual drama and sweet comfort.
📝 Ingredients
Cookie Dough
White Chocolate Chunks
Cream Cheese Glaze (Optional)
👨🍳 Instructions
- 1 Preheat oven to 175°C (350°F) and line two baking sheets with parchment paper.
- 2 Whisk together flour, cocoa, baking soda, and salt; set aside.
- 3 Cream butter, granulated sugar, and brown sugar until light and fluffy (≈3 min).
- 4 Add egg, vanilla, buttermilk, red coloring, and vinegar; mix until smooth.
- 5 Gradually incorporate dry ingredients on low speed; stop when just combined.
- 6 Fold in white chocolate chunks gently.
- 7 Chill dough 15 min; scoop 2‑tbsp portions onto sheets, spacing 2 in apart.
- 8 Bake 12‑14 min until edges set and tops slightly cracked.
- 9 Cool 5 min on sheet, then transfer to rack; drizzle glaze if desired.
- 10 Serve warm or at room temperature; store leftovers as described.