I still remember the day I ruined my grandmother's sacred strawberry shortcake. It was a sweltering July afternoon, the kind that makes butter sweat just sitting on the counter. I'd promised to bring dessert to a neighborhood barbecue, certain I could wing her famous recipe from memory. Three hours later, I was staring at a collapsed, weepy mess that looked like it had been run over by a lawnmower. The strawberries had turned into a sad, gray mush, the cake layers had fused into rubber, and my dignity was somewhere in the trash can with the failed experiment.
Fast forward through three more attempts, countless YouTube tutorials, and one particularly embarrassing moment where I served a version that tasted like wet cardboard and regret. I was ready to admit defeat and buy store-bought desserts forever. Then something magical happened during a late-night baking session fueled by desperation and half a bottle of wine. I stumbled upon a technique that would change everything — instead of fighting the strawberries, I learned to embrace their natural personality. The result? A dessert that combines everything you love about strawberry shortcake with the creamy stability of cheesecake, all in neat little bars that transport perfectly and slice like a dream.
Here's the thing about strawberry desserts: they're notorious divas. The berries release their juices at the worst possible moment, turning beautiful presentations into watercolor disasters. Traditional strawberry shortcake is basically a ticking time bomb of soggy tragedy. But these cheesecake bars? They're the superhero version — all the bright, sun-kissed strawberry flavor you crave, wrapped in a creamy, stable package that actually improves as it chills. The secret lies in treating the strawberries like the delicate treasures they are, coaxing out their flavor without unleashing their watery wrath.
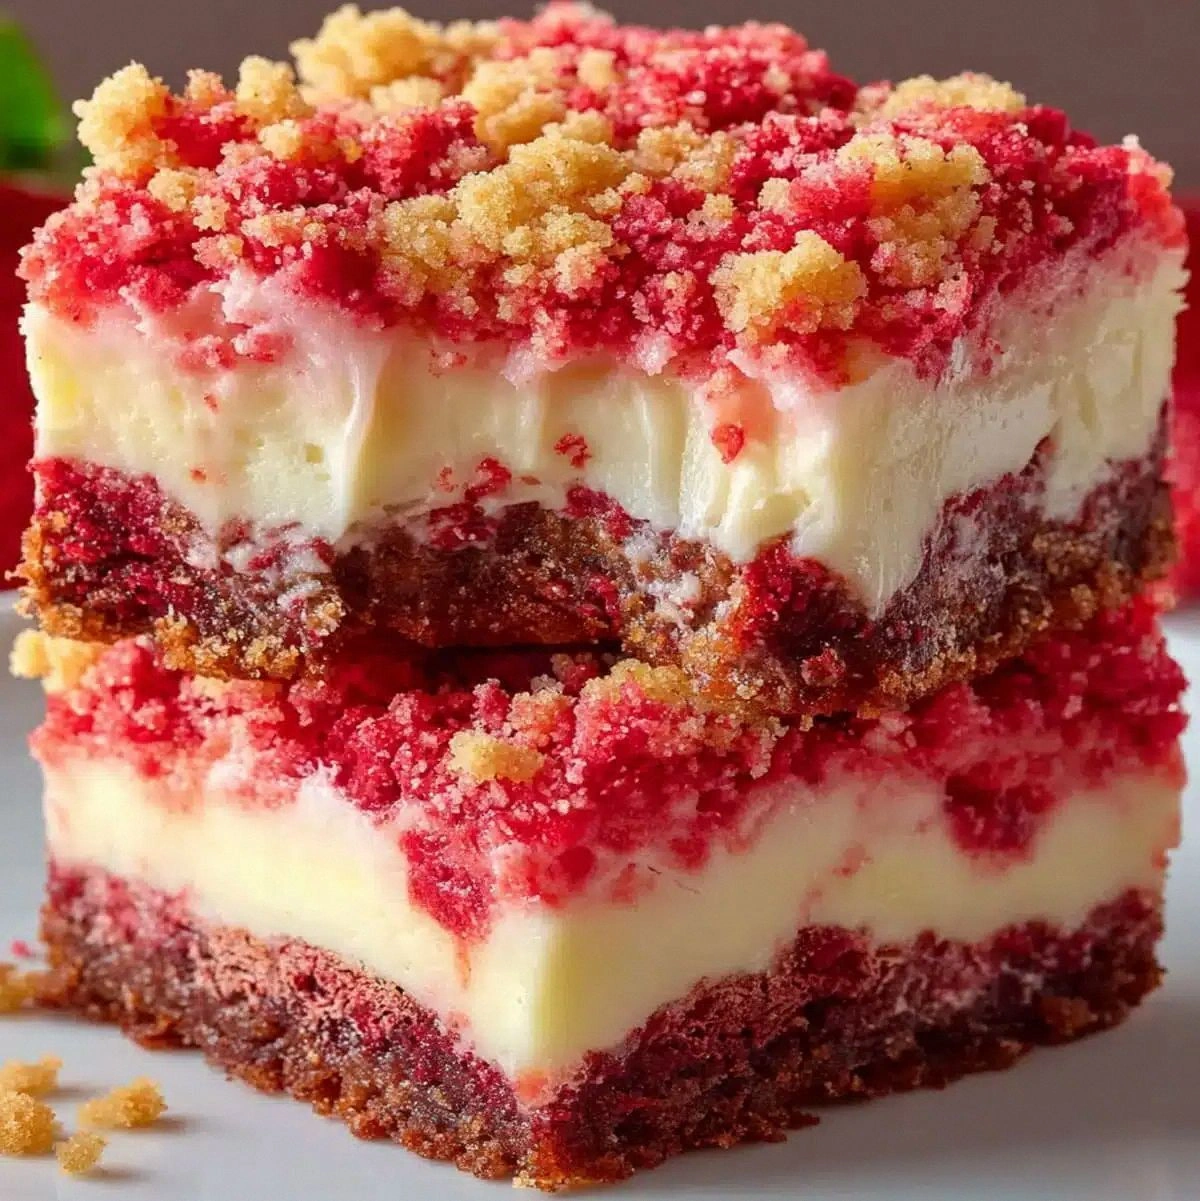
Picture this: a buttery shortbread crust that shatters like golden sand between your teeth, topped with a silken strawberry cheesecake layer swirled with ribbons of real fruit, finished with a cloud of whipped cream and jewel-toned berry pieces that stay perky for days. I dare you to taste this and not go back for seconds. The first time I served these at book club, they disappeared so fast that Linda actually scraped the pan with her finger when she thought nobody was looking. Let me walk you through every single step — by the end, you'll wonder how you ever made it any other way.
What Makes This Version Stand Out
This isn't just another strawberry dessert recipe thrown together by someone who thinks adding Jell-O counts as baking. This is the result of months of obsessive testing, late-night note-taking, and enough failed attempts to fill a bakery dumpster. What emerged is a recipe that solves every problem that plagues strawberry desserts while amplifying everything that makes them magical.
- Juice-Proof: The strawberry swirl technique locks in fresh fruit flavor without releasing watery disasters into your cheesecake. Each bite tastes like peak strawberry season without the soggy aftermath.
- Make-Ahead Hero: These bars actually improve after a day in the fridge, letting the flavors meld into something greater than their parts. Bake on Sunday, serve on Friday, watch people lose their minds.
- Texture Symphony: We're talking about three distinct layers that play together like a well-rehearsed orchestra — crunchy shortbread, creamy cheesecake, and bright strawberry bursts.
- Picnic Proof: Unlike traditional strawberry shortcake that collapses under its own weight, these bars hold their shape at room temperature for hours. Pack them for potlucks without fear.
- Flavor Depth: By roasting half the strawberries and leaving the rest fresh, you get both caramelized complexity and bright, just-picked vibrancy in every bite.
- Crowd Psychology: There's something about handheld desserts that makes people feel less guilty about taking seconds. These disappear faster than free concert tickets.
Alright, let's break down exactly what goes into this masterpiece...
Inside the Ingredient List
Great desserts start with understanding your ingredients like they're characters in a novel. Each one has its own personality, quirks, and perfect moment to shine. Skip one or substitute carelessly, and suddenly your masterpiece becomes a cautionary tale.
The Foundation Crew
Unsalted Butter: This isn't just fat — it's flavor's best friend. Cold butter cut into your flour creates those flaky pockets that make shortbread legendary. Skip the cheap stuff here; butter is the star of your crust, and you want the good European-style with 82% fat for maximum richness. If you absolutely must substitute, coconut oil works but you'll lose that irreplaceable butter flavor that makes these bars taste like childhood summers.
All-Purpose Flour: The reliable workhorse that gives your crust structure without making it tough. Don't overthink this — regular AP flour is perfect. Cake flour makes it too delicate, bread flour makes it tough like hockey pucks. The key is treating it gently, like you're folding clouds rather than building muscle.
Powdered Sugar: Here's where we get sneaky. Powdered sugar in the crust creates a more tender, melt-in-your-mouth texture than granulated sugar ever could. It's also got cornstarch mixed in, which helps absorb moisture and keeps your crust from getting soggy under the cheesecake layer.
The Creamy Dream Team
Cream Cheese: Full-fat, brick-style, nothing else will do. That low-fat stuff is just watery disappointment waiting to happen. Take it out of the fridge an hour before mixing — room temperature cream cheese blends smoothly without those infuriating lumps that ruin the texture. Philadelphia brand has the most consistent results, but any quality full-fat version works.
Sour Cream: The secret weapon for cheesecake that doesn't taste like a New York deli. It adds tang, lightens the texture, and helps prevent those dreaded cracks. Full-fat Greek yogurt works in a pinch, but you'll lose that subtle richness that makes people close their eyes when they taste it.
Eggs: Room temperature eggs incorporate more easily and create a smoother batter. Cold eggs can cause your cream cheese to seize up into tiny lumps that no amount of mixing will fix. Drop them in warm water for five minutes if you forgot to take them out ahead of time.
The Strawberry Stars
Fresh Strawberries: Here's where most recipes go wrong — they treat all strawberries the same. You want ripe but firm berries, the kind that smell like summer when you walk past them in the store. Avoid the giant, hollow ones that taste like water. Look for smaller, darker berries with intense fragrance. They'll have more concentrated flavor and less water content.
Strawberry Jam: This is your insurance policy. A few tablespoons of quality strawberry jam intensify the fruit flavor and help bind everything together. Choose one with real fruit listed as the first ingredient, not corn syrup with strawberry flavoring.
Lemon Zest: The unsung hero that makes strawberry flavor sing. Just a whisper of lemon zest brightens the berries and prevents the whole thing from tasting flat. Don't skip this — it's the difference between good and unforgettable.
The Final Flourish
Vanilla Extract: Real vanilla, not the imitation stuff that tastes like sadness. It rounds out the flavors and adds warmth that makes people feel cozy. Mexican vanilla has an almost spicy quality that pairs beautifully with strawberries.
Salt: Just a pinch, but it makes everything else taste more like itself. It's like the conductor of your flavor orchestra — you don't notice it's there, but everything falls apart without it.
Everything's prepped? Good. Let's get into the real action...
The Method — Step by Step
- Start with the crust: Preheat your oven to 350°F and line an 8x8 pan with parchment paper, leaving wings hanging over the sides for easy removal later. In a food processor, pulse together 1½ cups flour, ½ cup powdered sugar, and ¼ teaspoon salt. Add ¾ cup cold butter cubes and pulse until the mixture looks like coarse sand with pea-sized butter pieces. This texture is crucial — too fine and your crust becomes dense, too chunky and it falls apart. Press the mixture firmly into your prepared pan, creating an even layer that reaches the corners. Prick all over with a fork to prevent bubbling, then slide into the oven for 20 minutes until the edges turn golden and your kitchen smells like butter and possibilities.
- Roast your strawberries: While the crust bakes, toss 1 cup hulled and quartered strawberries with 1 tablespoon honey and a pinch of salt on a parchment-lined baking sheet. Roast at 350°F for 15 minutes until they release their juices and edges caramelize. This concentrates their flavor into strawberry essence that will make your bars taste like summer amplified. Let them cool slightly, then mash them with a fork — they should look like ruby jam. Don't skip this roasting step; it's what transforms ordinary strawberries into something that tastes like strawberry fields in concentrate form.
- Prepare the cheesecake base: In a large bowl, beat 16 ounces room temperature cream cheese until completely smooth and fluffy, about 2 minutes. Add ½ cup sugar and beat until incorporated, scraping down the sides religiously. Mix in ½ cup sour cream, 2 eggs (one at a time), 2 tablespoons flour, 1 teaspoon vanilla, and lemon zest from half a lemon. Beat just until combined — overmixing incorporates too much air, causing your cheesecake to soufflé and crack. The batter should be silky and pourable, like thick cream.
- Create the strawberry swirl: Reserve ½ cup of your cheesecake batter in a separate bowl. Add your roasted strawberry mash, 2 tablespoons strawberry jam, and fold gently with a spatula. You want ribbons of strawberry throughout, not a homogenous pink blob. The jam helps bind everything and intensifies that fresh strawberry flavor that makes people close their eyes when they taste it.
- Assemble the magic: Pour the plain cheesecake batter over your pre-baked crust, spreading it evenly. Dollop the strawberry mixture on top in random spoonfuls, then use a skewer or toothpick to create swirls. Don't over-swirl or you'll lose the dramatic contrast — aim for 4-5 figure-eights maximum. The pattern should look like abstract art, not a pink explosion. This next part? Pure magic.
- The water bath trick: Place your pan inside a larger roasting pan and pour hot water halfway up the sides. This prevents the dreaded cheesecake cracks and ensures even baking. If you're feeling lazy, place a pan of hot water on the rack below instead — it's not quite as effective but prevents major disasters. Bake at 325°F for 35-40 minutes until the edges are set but the center still jiggles like gentle waves when you shake the pan.
- Cool with patience: Turn off the oven, crack the door, and let your cheesecake cool inside for 1 hour. This gradual cooling prevents the thermal shock that causes cracks. Then remove from water bath and cool completely on a rack. Don't rush this — warm cheesecake is a gloopy mess that will fall apart when you try to cut it. Room temperature is your friend here.
- Chill to perfection: Cover with plastic wrap and refrigerate at least 4 hours, preferably overnight. This is when the flavors meld into something greater than their parts. The texture transforms from slightly wobbly to perfectly sliceable. If you cut too early, you'll have cheesecake soup that runs all over the plate and breaks your heart.
- Make the strawberry topping: Just before serving, toss 1 cup sliced fresh strawberries with 1 tablespoon sugar and a squeeze of lemon juice. Let them macerate for 10 minutes until they glisten like rubies. This brightens the flavor and makes them taste like they were just picked, even if they've been in your fridge for days.
- The grand finale: Lift the bars out using the parchment wings and cut with a hot, dry knife (wipe between cuts for perfect edges). Top each bar with a spoonful of macerated strawberries and a dollop of whipped cream if you're feeling fancy. The contrast between the creamy cheesecake, crunchy crust, and bright berries will make you wonder why anyone bothers with regular strawberry shortcake.
That's it — you did it. But hold on, I've got a few more tricks that'll take this to another level...
Insider Tricks for Flawless Results
After making this recipe more times than I care to admit (my neighbors started hiding when they saw me coming with dessert plates), I've discovered some game-changing techniques that separate amateur bakers from dessert legends.
The Temperature Rule Nobody Follows
Room temperature isn't just a suggestion — it's the difference between smooth cheesecake and lumpy disaster. Take everything out of the fridge 2 hours before baking. Cold cream cheese refuses to blend smoothly, leaving you with tiny white flecks that no amount of mixing will fix. Cold eggs can cause your cream cheese to seize up like curdled milk. Set a timer, forget about it, and come back to ingredients that behave like they want to become something beautiful.
Why Your Nose Knows Best
Don't trust recipes that give exact baking times — ovens are like snowflakes, no two are identical. Instead, trust your nose. When the cheesecake is perfectly baked, your kitchen will smell like vanilla and butter with a hint of strawberry perfume. If you smell something even slightly eggy or sulfurous, you've overbaked it. The edges should be set but the center should jiggle like gentle waves on a lake, not slosh around like a waterbed.
The 5-Minute Rest That Changes Everything
Here's where most people mess up: they try to cut hot cheesecake. Don't do it. Even after cooling to room temperature, your cheesecake needs those 4 hours in the fridge to set properly. But here's the pro tip: take it out 15 minutes before serving. Those 15 minutes at room temperature soften the cheesecake just enough to create that perfect creamy texture that melts on your tongue instead of turning into a cold, dense brick.
The Crust Insurance Policy
If you've ever had a soggy crust ruin your dessert, you know the heartbreak. After pre-baking your crust, brush it with a beaten egg white while it's still hot, then return to the oven for 2 minutes. This creates a waterproof barrier that keeps the cheesecake from turning your beautiful shortbread into mush. It's like raincoats for your dessert, and once you try it, you'll never skip this step again.
The Swirl Secret
Want those Instagram-worthy swirls that look like edible art? The key is temperature contrast. Your cheesecake batter should be room temperature, but your strawberry swirl should be slightly chilled. Warm batter + cold swirl = defined, beautiful patterns instead of pink mush. Drop the strawberry mixture in small spoonfuls, then use a skewer to create 3-4 figure-eights maximum. Over-swirling just makes everything pink and sad.
The Freshness Extender
These bars actually taste better the second day, but the strawberry topping can get weepy. Store the bars and fresh strawberry topping separately, combining just before serving. This keeps everything perky and bright instead of turning into a sad, watery mess. The cheesecake will keep for 5 days in the fridge, but let's be honest — they're usually gone by day two.
Creative Twists and Variations
This recipe is a playground. Here are some of my favorite ways to switch things up:
Berry Medley Magic
Swap half the strawberries for raspberries or blackberries for a more complex berry flavor. The tartness of raspberries cuts through the richness of the cheesecake like a perfect pairing. Blackberries add gorgeous purple swirls and a wine-like depth that makes these feel sophisticated enough for dinner parties. Just remember that raspberries are more delicate, so reduce the roasting time to 10 minutes to prevent them from turning into mush.
Chocolate Strawberry Dreams
Add 2 tablespoons cocoa powder to your crust mixture and replace ¼ cup flour with crushed chocolate cookies. The chocolate-strawberry combination tastes like those fancy boxes of chocolates, but better because you made it yourself. Top with chocolate shavings and a drizzle of dark chocolate for extra decadence. This version disappears fastest at office parties, probably because chocolate makes people feel less guilty about eating dessert for lunch.
Lemon Strawberry Sunshine
Add the zest of 2 lemons to your cheesecake batter and replace the lemon juice in the topping with orange juice. The lemon brightens everything and makes the strawberry flavor pop like it's been amplified. It's like strawberry lemonade in dessert form, perfect for summer picnics and baby showers. People who claim they don't like cheesecake change their minds after trying this version.
Almond Strawberry Elegance
Replace ¼ cup flour with almond flour in the crust and add ½ teaspoon almond extract to the cheesecake batter. The almond adds a sophisticated nuttiness that makes these taste like they came from a French patisserie. Top with sliced almonds for crunch and a dusting of powdered sugar for visual drama. This version pairs beautifully with coffee and makes you feel like you're eating dessert in Paris instead of your kitchen.
Coconut Strawberry Vacation
Add ½ cup toasted coconut to the crust and replace sour cream with coconut cream. The tropical coconut flavor makes these taste like a strawberry pina colada in dessert form. Toast extra coconut for topping and add a tiny umbrella if you're feeling festive. This version is dangerously good — I once ate four in one sitting while pretending to "test for quality control."
Mini Strawberry Cheesecake Bites
Make these in mini muffin tins for bite-sized treats that disappear at parties. Line the tins with paper liners, press in your crust, fill with cheesecake mixture, and bake for 12-15 minutes. The result is adorable two-bite desserts that people can't resist popping in their mouths. Perfect for bridal showers, birthday parties, or those moments when you want dessert but don't want to commit to a whole slice.
Storing and Bringing It Back to Life
Fridge Storage
Store these bars in an airtight container in the refrigerator for up to 5 days, though they're at their peak for the first 3 days. Place parchment paper between layers to prevent them from sticking together. The crust will gradually soften over time, but they'll still taste incredible. If you notice any condensation in the container, wipe it out with a paper towel — moisture is the enemy of that perfect texture.
Freezer Friendly
These bars freeze beautifully for up to 2 months. Cut them into individual portions, wrap each piece in plastic wrap, then place in a freezer bag. Thaw overnight in the refrigerator for best results. The texture changes slightly — they become a bit more dense, but the flavor remains spectacular. Pro tip: freeze them un-topped, then add fresh strawberry topping after thawing for the best of both worlds.
Best Reheating Method
These are meant to be served cold, but if your crust gets soggy or you prefer them slightly warmed, here's the trick: place individual bars on a baking sheet in a 200°F oven for 5-7 minutes. This gently warms the crust without melting the cheesecake into a puddle. Let them cool for 5 minutes before serving. Never microwave them — it turns the cheesecake rubbery and sad.