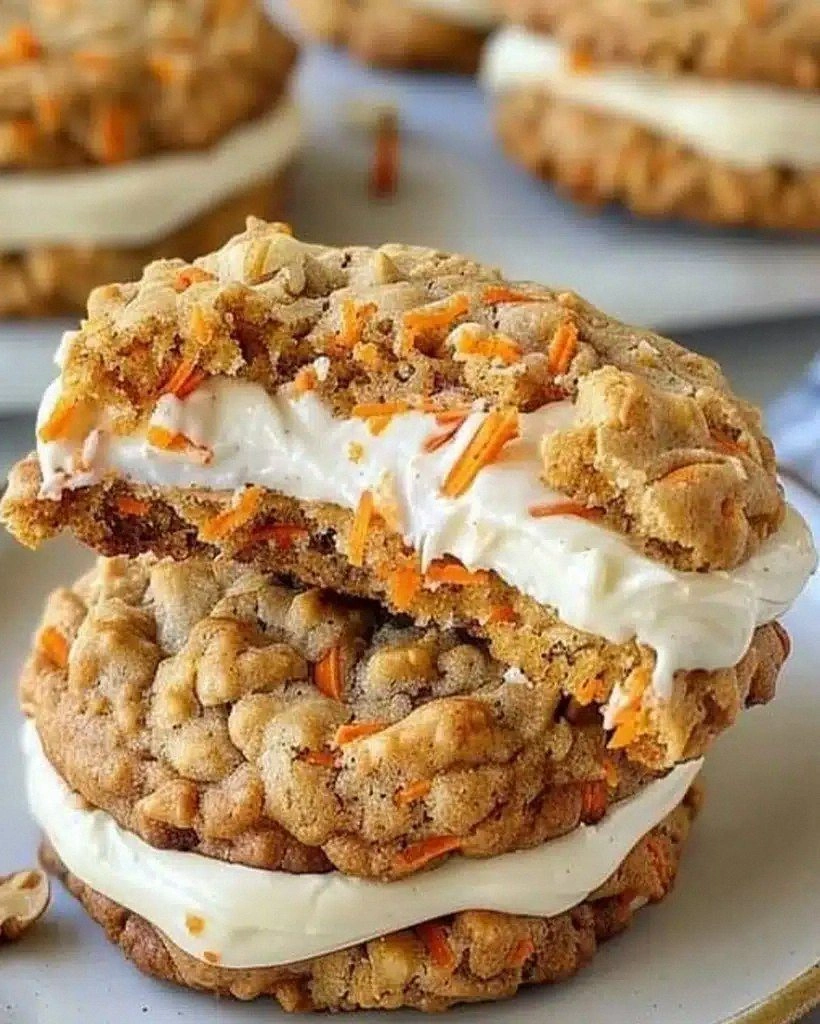
I'm standing in my kitchen at 2 AM, wearing mismatched socks and a face mask of flour, when I realize I've done something terrible. The carrot cake oatmeal cream pies I'd promised to bring to my nephew's birthday party tomorrow are gone. Every last one. I ate them. All twelve. My roommate found me hunched over the empty plate like a raccoon caught in the headlights, cream filling smeared across my cheek like war paint. This is what happens when you create something so dangerously delicious that even your self-control packs its bags and leaves. These aren't just cookies with filling — they're edible time machines that transport you straight back to your grandmother's kitchen, if your grandmother was a pastry wizard who understood that the secret to life lies in the perfect ratio of cinnamon to nostalgia.
The first time I made these, my neighbor rang my doorbell at dawn, still in her bathrobe, holding an empty Tupperware like Oliver Twist with his bowl. She'd smelled them baking through our shared wall and couldn't sleep. That's the power we're dealing with here — these cream pies don't just satisfy cravings, they create new ones you didn't know you had. The soft, chewy oatmeal cookies hug a cloud of carrot cake-spiced cream filling that's so light it practically floats off the parchment paper. Each bite cracks through the slightest exterior crisp into tender, spiced cookie, then explodes into creamy heaven that tastes like someone blended your favorite carrot cake with the fluffiest buttercream you've ever met.
What makes this version different from every other cream pie recipe cluttering the internet? I spent three months testing, tweaking, and taste-testing my way through seventeen different batches. I discovered that most recipes fail because they treat the cookie like an afterthought — just a vehicle for the filling. Wrong. The cookie needs to be spectacular on its own, then play nice with the filling. I also learned that traditional cream pie filling turns into a sad, soggy mess after a day. Mine stays cloud-like for five days (if they last that long, which they won't). Plus, I cracked the code on getting that authentic carrot cake flavor without any weird texture issues from shredded carrots in your cookies.
Here's the kicker — I use a technique that sounds absolutely bonkers but creates pure magic. We're going to toast our oats in brown butter until they smell like caramel and campfire, then let them soak in a secret mixture that makes them taste like they've been marinating in carrot cake spices for years. Stay with me here because this next part is worth it: we're adding a whisper of pineapple juice to both the cookies and the filling. Don't freak out — you won't taste pineapple. It just makes everything taste more like carrot cake, like how a bay leaf makes stew taste more like stew without tasting like bay leaf. Let me walk you through every single step — by the end, you'll wonder how you ever made it any other way.
What Makes This Version Stand Out
Flavor Bomb: These cream pies taste like someone took the best parts of carrot cake — the warm spices, the caramelized edges, the cream cheese frosting — and condensed them into portable, hand-held form. The cookies alone could win awards, but when sandwiched with that cloud-like filling, they become legendary.
Texture Perfection: Most oatmeal cream pies turn into hockey pucks overnight. Not these bad boys. They stay soft and chewy for days thanks to a secret ingredient that keeps them tender (spoiler: it's the pineapple juice, but we'll get to that).
Weekend Project Made Easy: Despite tasting like they came from a fancy bakery, these come together in under two hours. Most of that is chilling time, which means you can clean your kitchen and still have time to binge your favorite show while the dough firms up.
Unexpected Ingredients: Brown butter toasted oats, a touch of pineapple juice, and a special blend of seven spices create layers of flavor that make people close their eyes when they take the first bite. That reaction never gets old.
Crowd Control Challenge: I dare you to taste this and not go back for seconds. I've seen grown adults hide these from their children. My mail carrier started bringing me gifts after I gave him one. These cream pies create addicts.
Make-Ahead Champion: The dough freezes beautifully for up to three months, and the filling stays perfect in the fridge for a week. I always keep emergency dough balls in my freezer for those days when only homemade comfort food will do.
Instagram Gold: They photograph like supermodels. The rustic oatmeal texture, the cream filling peeking out like a secret — these babies rack up likes faster than cat videos. My food blogger friends keep begging for the recipe.
Alright, let's break down exactly what goes into this masterpiece...
Inside the Ingredient List
The Flavor Foundation
Old-fashioned oats are the backbone here, but not just any oats — we're talking about oats that have been transformed through the magic of brown butter. When you toast them until they're golden and nutty, they develop this incredible depth that makes the cookies taste like they've been infused with caramel and toasted coconut simultaneously. The brown butter itself is liquid gold, carrying toasted milk solids that add a nutty, almost butterscotch note that regular melted butter could never achieve. Don't even think about using quick oats or instant oats here — they turn to mush and make your cookies taste like sadness and disappointment.
Dark brown sugar is non-negotiable for that deep, molasses-rich flavor that makes these taste like proper carrot cake. The extra molasses in dark brown sugar compared to light brown sugar creates those chewy edges that shatter like thin ice when you bite into them, revealing the tender center. Plus, it helps the cookies spread just right — not too thin, not too puffy — creating the perfect sandwich shape. If you've only got light brown sugar, you can fake it by adding an extra tablespoon of molasses, but honestly, just buy the dark stuff. Your taste buds will thank you.
The Spice Symphony
Cinnamon gets top billing, but we're not using just any cinnamon. Ceylon cinnamon, sometimes called "true cinnamon," has a more delicate, complex flavor than the stronger cassia cinnamon most people have in their pantry. It tastes like warmth and comfort without that harsh, almost medicinal bite that cheap cinnamon can have. Combined with nutmeg, ginger, cardamom, allspice, and a whisper of cloves, it creates a spice blend that tastes like carrot cake but better — brighter, more interesting, with each spice playing its part without overwhelming the others.
The secret weapon here is the tiniest pinch of white pepper. I know, I know — it sounds weird. But white pepper adds this subtle heat that makes all the other spices pop, like turning up the contrast on a photo. You won't taste pepper, but you'll notice that the spices taste more vibrant, more alive. It's the difference between a good spice blend and one that makes people close their eyes and sigh with pleasure.
The Unexpected Star
Pineapple juice is my sneaky trick for getting that authentic carrot cake flavor without any weird texture from actual pineapple in the cookies. Just a tablespoon in the dough and another in the filling makes everything taste more like carrot cake — it's like how a bay leaf makes stew taste more like stew. The enzymes in pineapple juice also help tenderize the oats, making the cookies stay softer longer. Don't worry, you won't taste pineapple. It just makes everything taste more like itself, if that makes sense.
Carrot powder might sound like something only hardcore bakers keep around, but it's a game-changer for getting real carrot flavor without the moisture and texture issues of shredded carrots in cookies. You can find it online or make your own by dehydrating carrot peels in a low oven and grinding them to powder. It concentrates that sweet, earthy carrot flavor into something that can hold its own against all those warm spices. If you can't find it, you can substitute with very finely grated carrot that's been squeezed dry, but the powder is worth tracking down.
The Texture Makers
Bread flour might seem like an odd choice for cookies, but here's the thing — the higher protein content creates more gluten, which gives these cookies their incredible chewy texture. They'll bend before they break, creating that perfect cream pie cookie that holds together when you bite into it but doesn't shatter like shortbread. The extra gluten also helps trap moisture, keeping them soft for days. Don't panic if you only have all-purpose flour — your cookies will still be delicious, just slightly more tender and delicate.
Cream of tartar is my insurance policy against spreading disasters. It helps stabilize the egg whites (even though we're not whipping them separately) and keeps the cookies from turning into puddles on the baking sheet. Plus, it adds a subtle tang that plays beautifully with the cream cheese in the filling. If you don't have any, you can substitute with half the amount of lemon juice or white vinegar, but cream of tartar is cheap and lasts forever, so just buy some already.
Everything's prepped? Good. Let's get into the real action...
The Method — Step by Step
- Start by browning your butter — and I mean really browning it, not just melting it. Place one cup (two sticks) of unsalted butter in a light-colored saucepan over medium heat. Let it melt, then foam, then watch closely as the milk solids turn golden brown and it smells like toasted nuts and caramel. This takes about 8-10 minutes total, but the last minute is crucial — those milk solids go from perfect to burnt faster than you can say "cream pie." When it's done, immediately pour it into a heatproof bowl to stop the cooking, making sure to scrape all those toasty brown bits into the bowl. Let it cool for about 15 minutes — we want it liquid but not hot enough to cook our eggs.
- While the butter cools, toast your oats in a dry skillet over medium heat, stirring constantly until they smell like popcorn and take on a light golden color. This takes about 5-7 minutes, and trust me, your kitchen will smell incredible. Don't walk away — oats go from toasted to burnt in the blink of an eye. Once they're fragrant and golden, transfer them to a plate to cool completely. This step is what transforms ordinary oatmeal cookies into something that tastes like they came from a fancy bakery.
- In a large bowl, whisk together the flour, baking soda, cream of tartar, salt, and all those beautiful spices. I like to sift everything together twice — yes, it's extra work, but it ensures the spices are evenly distributed so every bite tastes perfectly balanced. The mixture should smell like autumn and make you want to dive in face-first. Set this aside and try not to eat it by the spoonful (I've done it, it's not great).
- In the bowl of your stand mixer (or with a hand mixer), beat the cooled brown butter with both sugars until the mixture looks like wet sand and smells like caramel. This takes about 3-4 minutes on medium speed. Add the eggs one at a time, beating well after each addition, then add the vanilla and pineapple juice. The mixture should look glossy and smooth, like liquid toffee. If it looks curdled, your butter was probably too hot — pop the bowl in the fridge for 10 minutes and try again.
- Now for the fun part — adding the toasted oats and carrot powder. Reduce the mixer speed to low and add the oat mixture in three additions, alternating with the flour mixture in two additions, starting and ending with oats. Mix just until combined — overmixing here makes tough cookies, and nobody wants that. The dough will look like a beautiful, chunky oatmeal studded with tiny orange flecks from the carrot powder. It should smell like carrot cake and make your stomach growl audibly.
- Cover the dough with plastic wrap pressed directly onto the surface and refrigerate for at least 2 hours, preferably overnight. I know, I know — waiting is torture when you want cookies NOW. But this step is crucial for developing flavor and preventing the cookies from spreading into puddles. The dough will firm up considerably and the flavors will meld into something magical. Plus, cold dough is easier to scoop and bakes more evenly.
- When you're ready to bake, preheat your oven to 350°F (175°C) and line two baking sheets with parchment paper. Use a medium cookie scoop (about 2 tablespoons) to portion the dough onto the prepared sheets, leaving 2 inches between each cookie. They spread more than you'd expect, so give them room to breathe. Flatten each ball slightly with the palm of your hand — they should look like thick discs, not perfect spheres. Bake for 12-14 minutes, until the edges are set and golden but the centers still look slightly underbaked. They'll finish cooking on the hot sheet after you take them out.
- While the cookies cool, make the cream filling — and prepare to have your mind blown. Beat the cream cheese and butter together until they're lighter than air and completely combined, about 3 minutes. Add the powdered sugar gradually to avoid a snowstorm in your kitchen, then beat in the vanilla, pineapple juice, and all those warm spices. The filling should be fluffy and spreadable, like the best buttercream you've ever had but with a tangy cream cheese note that makes it taste like proper carrot cake frosting. If it's too thick, add cream a teaspoon at a time. Too thin? More powdered sugar.
That's it — you did it. But hold on, I've got a few more tricks that'll take this to another level...
Insider Tricks for Flawless Results
The Temperature Rule Nobody Follows
Here's the thing that separates good bakers from great ones — temperature matters more than anything else in this recipe. Your butter should be cool but still liquid when you mix it with the sugars, your eggs should be room temperature, and your cream cheese should be soft but not melty. I learned this the hard way after making batch after batch of greasy, flat cream pies that looked like they'd been run over by a truck. Now I plan ahead: take your cream cheese out the night before, your eggs out two hours before baking, and let your brown butter cool for exactly 15 minutes before using it. It's like having a recipe for success built right into your timeline.
Why Your Nose Knows Best
Trust your sense of smell more than your eyes when making these cream pies. The oats are toasted when they smell like popcorn and your kitchen suddenly feels cozy. The brown butter is done when it smells like caramel and toasted nuts, not when it looks a certain color (because every pan is different). The cookies are baked when they smell like carrot cake and you can't resist sneaking one off the sheet. I'll be honest — I ate half the batch before anyone else got to try it because the smell drove me absolutely insane. My neighbors probably think I'm running an illegal bakery with all the amazing aromas wafting from my kitchen at odd hours.
The 5-Minute Rest That Changes Everything
After you fill the cream pies, resist the urge to immediately devour them. Let them sit for five minutes — I know it's torture, but this brief rest lets the filling set slightly and the cookies soften just enough to achieve that perfect cream pie texture. It's the difference between a good cream pie and one that makes people close their eyes and make embarrassing noises. A friend tried skipping this step once — let's just say it didn't end well. The filling squished out everywhere, creating a delicious but deeply unphotogenic mess that looked like a cream pie crime scene.
The Secret to Bakery-Perfect Edges
Want those gorgeous, professional-looking edges that make people think you bought these at a fancy bakery? Use a small offset spatula or the back of a spoon to smooth the cream filling right to the edges of each cookie before sandwiching. Then, take a clean finger and gently press around the perimeter to create that perfect rounded edge. It takes an extra thirty seconds per cream pie, but the result looks like something from a magazine shoot. Plus, it ensures every bite has the perfect ratio of cookie to filling — no sad, dry edges or overly creamy centers.
Creative Twists and Variations
This recipe is a playground. Here are some of my favorite ways to switch things up:
Tropical Escape Cream Pies
Add 1/2 cup of toasted coconut to the cookie dough and replace the pineapple juice with orange juice. Fold some toasted coconut into the cream filling and add a teaspoon of orange zest. These taste like carrot cake went on vacation to Hawaii and came back with a tan and stories about swimming with dolphins. They're particularly amazing in winter when you need a reminder that somewhere, it's warm and sunny.
Maple Bacon Breakfast Cream Pies
Replace half the brown sugar with maple sugar and add 1/4 cup of crispy bacon bits to the cookie dough. The filling gets a tablespoon of maple syrup instead of pineapple juice. These are dangerously good for breakfast — the maple and bacon play beautifully with the warm spices, creating something that tastes like the best pancakes you've ever had but in cream pie form. My brunch guests literally hide these from each other.
Chocolate Lover's Dream
Add 1/3 cup of cocoa powder to the flour mixture and fold in 1/2 cup of mini chocolate chips. The filling gets a tablespoon of cocoa powder and some grated dark chocolate. These taste like carrot cake and chocolate cake had a beautiful baby that's somehow better than both parents. The chocolate doesn't overpower the spices — it just makes them taste deeper, more complex, like they aged in an oak barrel or something.
Gluten-Free Without Compromise
Substitute the flour with a 1:1 gluten-free baking blend and add an extra egg yolk for richness. Make sure your oats are certified gluten-free (oats are often processed in facilities that handle wheat). The result is so good that my gluten-eating friends can't tell the difference. One even accused me of tricking her into eating gluten — that's how convincing these are.
Savory-Sweet Sophisticated
Add 1 teaspoon of fresh rosemary (minced super fine) and 1/2 teaspoon of black pepper to the cookie dough. The filling gets a tablespoon of honey and a pinch of sea salt. These taste like something you'd get at a fancy restaurant — the herb and pepper add this sophisticated edge that makes them perfect for dinner parties. They're the cream pies that make people say "wow, I never would have thought of that combination."
Mini Cream Pie Party
Use a tiny cookie scoop to make bite-sized cookies, then sandwich them with a star-tipped swirl of filling. These are dangerous — you can eat like twenty without realizing it. I make these for parties and watch them disappear faster than the wine. Pro tip: make double the filling because people will try to steal it by the spoonful when they think you're not looking.
Storing and Bringing It Back to Life
Fridge Storage
Unfilled cookies keep in an airtight container at room temperature for up to 5 days, but let's be real — they won't last that long. Once filled, store the cream pies in the fridge for up to 4 days, but take them out 30 minutes before serving so the filling softens. Cold cream pie filling has the texture of clay, but room temperature filling is like eating a cloud. I learned this the hard way when I served fridge-cold cream pies to guests who politely chewed them like they were eating frozen hockey pucks.
Freezer Friendly
These cream pies freeze like champions. Wrap each assembled pie individually in plastic wrap, then store in a freezer bag for up to 2 months. Thaw overnight in the fridge, then let come to room temperature for 30 minutes before serving. They taste almost exactly like fresh — the filling might be slightly denser, but honestly, most people can't tell the difference. I always keep a stash in my freezer for emergencies, which in my house means "it's Tuesday and I need something delicious."
Best Reheating Method
If your cookies have gone slightly stale (though they shouldn't if you stored them properly), you can revive them. Wrap a slightly damp paper towel around each cookie and microwave for 8-10 seconds. The steam will soften them right up. For the filled cream pies, skip the microwave — it makes the filling weird. Instead, let them sit at room temperature for an hour, or if you're really impatient, hold them in your closed hands for a few minutes. Your body heat will soften the filling without melting it into a mess.