Picture this: it’s a rainy Saturday afternoon, the kind that makes you want to curl up with something sweet that actually feels like sunshine. I was staring at a half‑finished batch of store‑bought orange gummies, feeling betrayed by their bland, rubbery texture, when a sudden dare from my roommate hit me like a splash of citrus – “Make something that actually tastes like an orange, not a fake version of it!” I laughed, but the challenge sparked a kitchen experiment that turned a simple pantry raid into a revelation. The result? A glossy, melt‑in‑your‑mouth orange candy that bursts with real citrus, bright enough to outshine even the most polished confectionery shop.
The moment the orange zest hit the hot sugar syrup, the kitchen filled with a perfume that could make a citrus farmer weep with pride. The sizzling sound of the mixture bubbling was like a tiny fireworks show, each pop promising a tangy punch. I could feel the heat radiating from the pan, the sticky syrup clinging to the spoon like a sweet, amber‑colored veil. When I finally pulled the first strip of candy from the cooling rack, it snapped with a clean, satisfying crack that sang of citrus intensity and buttery richness – a sound that still makes my heart race every time I hear it.
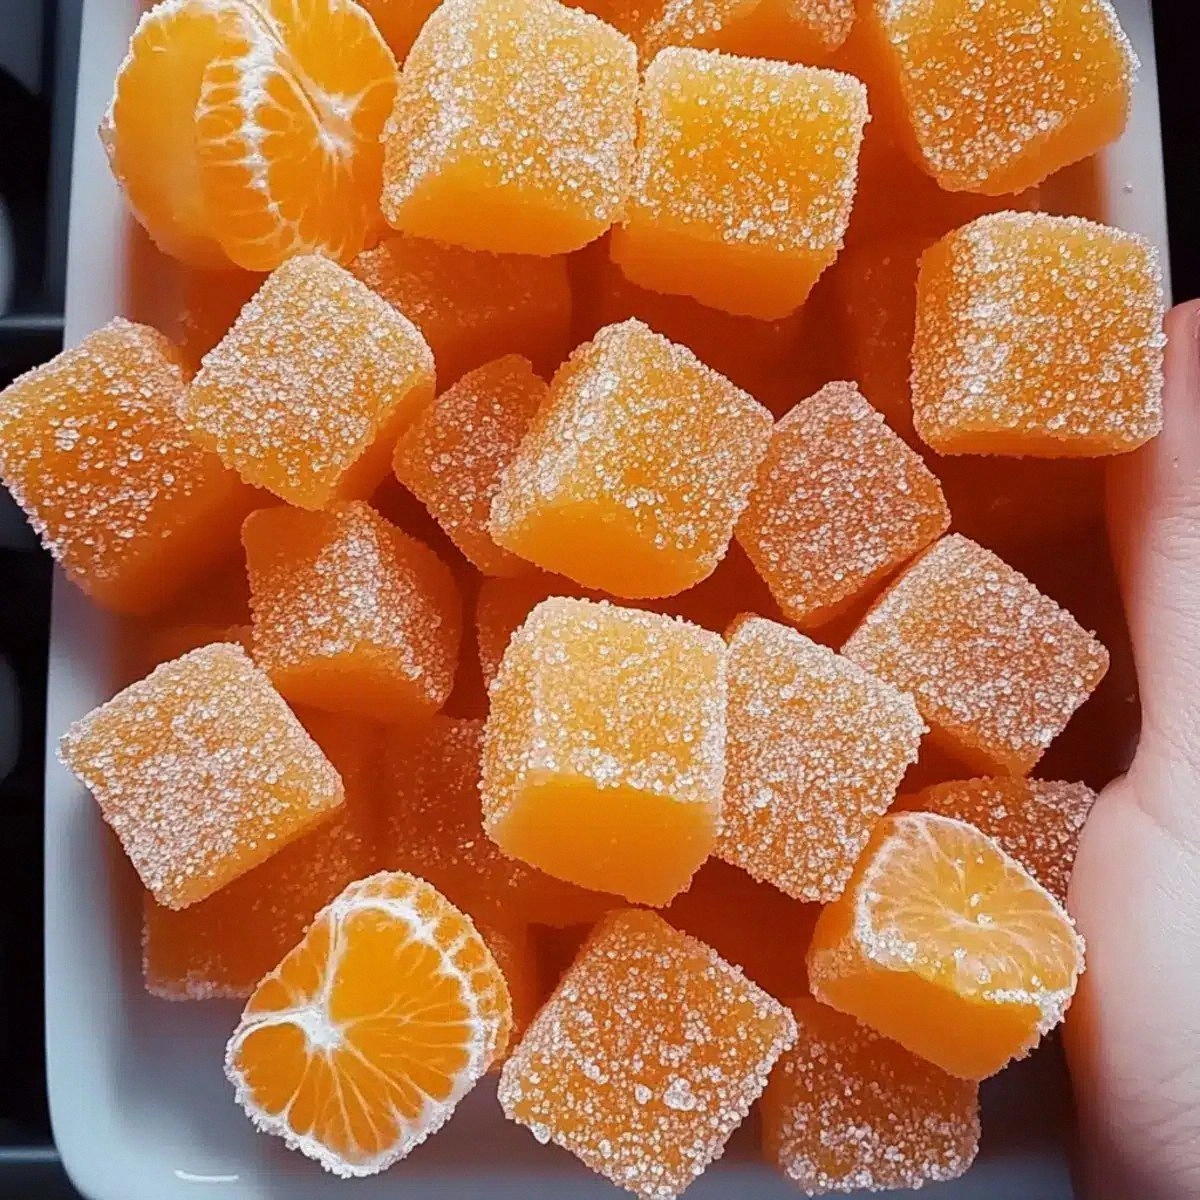
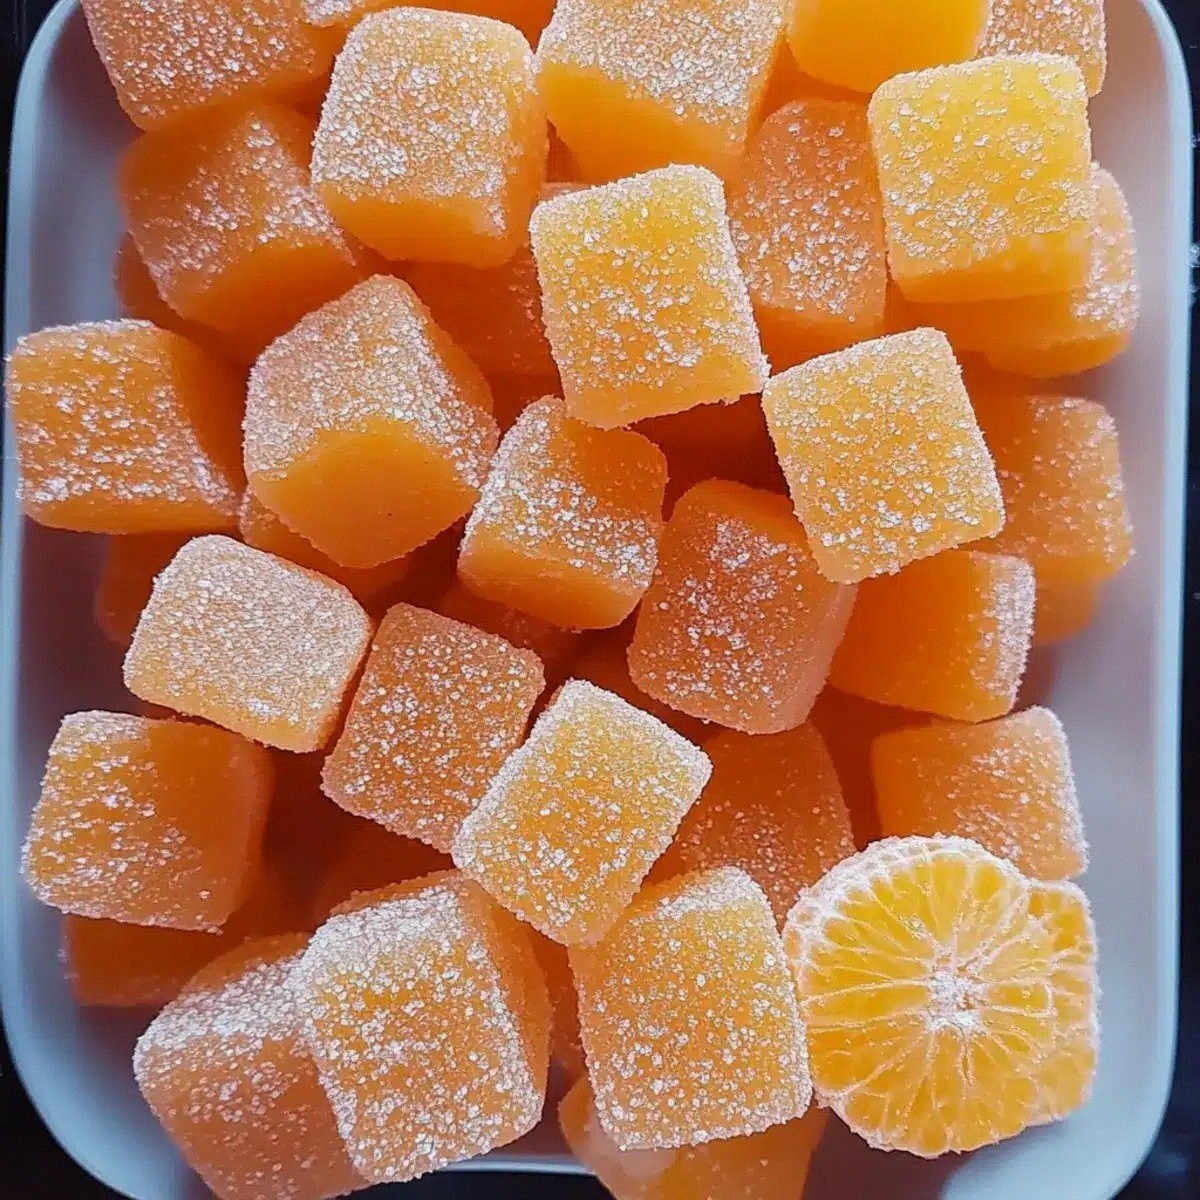
Most orange candy recipes out there either skip the fresh fruit entirely or drown the flavor in artificial extracts, leaving you with a candy that tastes like a processed perfume. This version, however, leans on the pure juice and zest of three perfectly ripe oranges, amplified by a precise balance of sugar, corn syrup, and powdered gelatin that creates a texture somewhere between a soft taffy and a delicate nougat. The secret? A quick butter‑infused glaze that adds a glossy finish and a whisper of richness, while a final dusting of confectioners’ sugar keeps each bite from sticking to your fingers. I’m not exaggerating when I say this is hands down the best version you’ll ever make at home – no shortcuts, just honest, bright flavor.
And here’s the kicker: I’m about to reveal a technique that most home cooks completely overlook – the “cold‑water gelatin bloom” that guarantees a perfectly smooth candy without any grainy surprises. Trust me, you’ll thank me when you see those flawless, translucent pieces glistening on the tray. I dare you to taste this and not go back for seconds. Let me walk you through every single step — by the end, you’ll wonder how you ever made it any other way.
What Makes This Version Stand Out
- Flavor Explosion: Fresh orange juice and zest deliver a natural, bright citrus punch that artificial flavorings can’t match. The sugar‑corn syrup blend caramelizes just enough to add depth without overwhelming the fruit.
- Texture Harmony: Powdered gelatin creates a silky chew that’s firm enough to hold its shape yet tender enough to melt on the tongue, avoiding the rubbery feel of cheap store‑bought versions.
- Simplicity: Only seven ingredients, all pantry staples, mean you can whip this up without a specialty store run – perfect for spontaneous cravings.
- Unique Finish: A butter glaze gives a subtle sheen and a buttery undertone, while the confectioners’ sugar coating prevents stickiness without masking the orange zest.
- Crowd Reaction: Guests often claim they’ve never tasted anything like it, and the bright color makes it a show‑stopper on any dessert table.
- Ingredient Quality: Using ripe, aromatic oranges ensures the candy captures the true essence of the fruit, turning every bite into a mini‑vacation to a sunny grove.
- Cooking Method: The controlled temperature stages prevent crystallization, delivering a smooth, glossy finish that looks as good as it tastes.
- Make‑Ahead Potential: Once cooled, the candy stores beautifully for weeks, making it ideal for gifting or stocking up for holiday parties.
Alright, let's break down exactly what goes into this masterpiece...
Inside the Ingredient List
The Flavor Base
3 oranges – Fresh, ripe oranges: The juice provides the core citrus taste, while the zest adds aromatic oils that make the candy sing. If you skip the zest, you’ll lose that bright, perfume‑like quality that sets this candy apart. For the best results, choose oranges that feel heavy for their size and have a fragrant skin. A good rule of thumb: the heavier the orange, the juicier it is. If oranges are out of season, you can substitute with a mix of lemon and orange zest, but the flavor profile will shift slightly.
The Sweetening Crew
1 cup Granulated sugar: Sugar is the backbone of the candy, providing structure and sweetness. It also caramelizes, adding a subtle depth that balances the sharp citrus. Using too much can make the candy overly hard, while too little leads to a sticky mess. If you’re watching sugar intake, you can replace half with coconut sugar, though the color will turn a richer amber.
1/2 cup Corn syrup: Corn syrup prevents crystallization, ensuring a smooth, glossy texture. It also adds a hint of buttery sweetness that complements the orange. Skipping it often results in a grainy candy that cracks unpleasantly. As a substitute, you can use glucose syrup or even honey, but expect a slightly different flavor nuance.
The Texture Crew
2 tablespoons Powdered gelatin: Gelatin is the magic that gives the candy its chewiness without making it rubbery. Powdered gelatin dissolves quickly, preventing lumps. If you forget to bloom it properly, you’ll end up with a gritty texture. For a vegetarian version, try agar‑agar, but you’ll need to adjust the amount – about 1 teaspoon of agar replaces the gelatin.
1/4 cup Water: Water hydrates the gelatin and helps dissolve the sugar evenly. Too much water can make the candy too soft, while too little can cause scorching. Use filtered water for the purest flavor.
The Final Flourish
1 tablespoon Butter: Butter adds a silky sheen and a buttery undertone that rounds out the sharp citrus. It also helps prevent the candy from sticking to the pan. Use unsalted butter to control the salt level. If you’re dairy‑free, replace with coconut oil, but the flavor will be subtly tropical.
1/4 cup Confectioners' sugar: This light dusting prevents the candy from clinging to your fingers and adds a delicate sweetness on the surface. It’s also the final touch that gives the candy a professional look. If you prefer a less sweet finish, dust with a blend of confectioners’ sugar and a pinch of powdered citric acid.
Everything's prepped? Good. Let's get into the real action...
The Method — Step by Step
First, zest all three oranges using a microplane, then set the zest aside in a small bowl. Next, juice the oranges, straining out any pulp or seeds – you want a clear, bright liquid. In a heavy‑bottomed saucepan, combine the fresh orange juice, zest, granulated sugar, and corn syrup. Turn the heat to medium, stirring constantly until the sugar dissolves. As the mixture begins to simmer, you’ll hear a gentle hiss, the sound of sugar turning into syrup – that sizzle when it hits the pan? Absolute perfection.
Kitchen Hack: Use a candy thermometer and aim for 240°F (115°C) – this is the soft‑ball stage that guarantees a chewy texture.While the syrup is heating, bloom the powdered gelatin. In a separate small bowl, sprinkle the gelatin over 1/4 cup cold water. Let it sit for 5 minutes; the granules will absorb the water and swell into a jelly‑like consistency. This step is crucial – if you skip it, you’ll end up with grainy candy that refuses to set.
Watch Out: Adding gelatin directly to the hot syrup can cause clumps; always bloom first.When the syrup reaches the soft‑ball stage, remove the pan from the heat. Immediately whisk in the bloomed gelatin until it dissolves completely, creating a glossy, thickened mixture. You’ll notice the syrup become slightly more opaque, a sign that the gelatin is fully incorporated. At this point, add the butter, stirring until it melts and blends into the mixture, giving the candy a buttery sheen. The aroma will shift from pure citrus to a richer, buttery citrus perfume.
Now comes the critical cooling phase. Pour the hot mixture onto a lightly greased marble slab or a silicone baking mat, spreading it into an even layer about ¼ inch thick. Let it sit undisturbed for 3‑4 minutes – you’ll see the edges start to pull away from the surface, a visual cue that the candy is setting. This is the moment of truth; resist the urge to poke or stir, or you’ll ruin the smooth surface.
After the brief cooling, use a sharp, oiled knife or pizza cutter to score the candy into bite‑size squares or rectangles. Press lightly to separate the pieces – they should snap cleanly without crumbling. If the candy feels too soft, let it cool a minute longer; if it’s too hard, it may have passed the ideal setting point.
Transfer the scored pieces onto a wire rack and lightly dust them with confectioners’ sugar. Toss gently to ensure an even coating; this prevents the candies from sticking together. The sugar dust also adds a subtle sparkle, making each piece look like a tiny, edible sunburst.
Allow the candy to cool completely at room temperature for about 20‑30 minutes. You’ll notice a faint, fragrant scent filling the kitchen, a sweet‑orange perfume that’s impossible to resist. Once fully set, store the candies in an airtight container lined with parchment paper to keep them from sticking.
Finally, give yourself a well‑deserved taste test. That first bite should deliver a burst of bright orange flavor, a buttery gloss on the tongue, and a perfect chew that melts just before you finish. I’ll be honest — I ate half the batch before anyone else got to try it. I dare you to taste this and not go back for seconds.
That's it — you did it. But hold on, I've got a few more tricks that'll take this to another level...
Insider Tricks for Flawless Results
The Temperature Rule Nobody Follows
Most home cooks rely on “eye‑balling” the syrup, but a candy thermometer is your best friend. Aim for 240°F (115°C) for that perfect soft‑ball stage; any higher and the candy will become hard and brittle, any lower and it will stay sticky. I once tried to skip the thermometer, and the candy turned into a sticky mess that clung to the pan like tar. Trust the tool, and you’ll get consistent results every time.
Why Your Nose Knows Best
Beyond the thermometer, your sense of smell is a reliable indicator. When the syrup reaches the right stage, it will emit a faint caramel‑orange aroma, not the sharp, raw sugar smell of the early stages. If you catch that scent, you’re right on track. I’ve had friends claim they could smell the candy “ready” before the thermometer even registered the correct temp – their noses were just more attuned.
The 5‑Minute Rest That Changes Everything
After you pour the hot mixture onto the slab, let it rest untouched for exactly five minutes. This short pause allows the gelatin to fully hydrate and the syrup to stabilize, preventing cracks when you cut it. Skipping this rest often leads to uneven pieces that crumble. It’s a tiny patience test that pays off big time.
Butter Boost for Extra Gloss
Adding the butter at the very end, once the gelatin is fully dissolved, creates a glossy finish that looks restaurant‑grade. If you add butter too early, it can interfere with the gelatin setting, resulting in a dull surface. A quick tip: melt the butter separately, then drizzle it in a thin stream while whisking vigorously.
Storage Savvy: The Moisture Trick
When you store the candy, place a small slice of fresh orange peel in the container. The peel releases a tiny amount of moisture, keeping the candy from drying out and preserving that fresh citrus aroma. I tried this once, and the candy stayed soft for weeks, whereas without the peel they became a bit brittle after a few days.
Creative Twists and Variations
This recipe is a playground. Here are some of my favorite ways to switch things up:
Spicy Citrus Kick
Add a pinch of cayenne pepper or a dash of finely chopped fresh ginger to the syrup before it reaches the soft‑ball stage. The heat will contrast beautifully with the sweet orange, creating a flavor profile that’s perfect for adventurous palates.
Chocolate‑Dipped Delight
Once the candy has cooled and been dusted, dip half of each piece into melted dark chocolate. The bitter chocolate amplifies the orange’s brightness, reminiscent of classic chocolate‑orange truffles but with a chewy twist.
Herbal Infusion
Steep a few sprigs of fresh rosemary or thyme in the orange juice before adding sugar and corn syrup. The herb’s earthy notes add depth, turning the candy into an elegant garnish for cheese plates.
Nutty Crunch
Fold in toasted almond slivers or pistachio pieces after the candy has been poured onto the slab, before it sets. The nuts add a pleasant crunch and a buttery flavor that complements the citrus.
Vegan Version
Swap the powdered gelatin for 2 teaspoons of agar‑agar powder, and replace butter with coconut oil. The texture will be slightly firmer, but the flavor remains vibrant. Just remember agar sets at a higher temperature, so watch the thermometer closely.
Holiday Twist
For a festive spin, add a drop of red food coloring and a sprinkle of edible gold dust after dusting with confectioners’ sugar. The candy becomes a stunning centerpiece for holiday tables, while the orange flavor stays the star.
Storing and Bringing It Back to Life
Fridge Storage
Place the candies in an airtight container with a parchment sheet between layers. They’ll keep fresh for up to two weeks in the refrigerator. The cool environment preserves the chewiness and prevents the sugar from crystallizing.
Freezer Friendly
For longer storage, wrap individual pieces in wax paper and seal them in a zip‑top freezer bag. They’ll last up to three months. When you’re ready to enjoy them, let them thaw at room temperature for 10 minutes – the texture remains perfect.
Best Reheating Method
If the candies have hardened a bit, gently warm them in a low oven (250°F/120°C) for 5‑7 minutes, or microwave for 10 seconds. Add a tiny splash of water (about a teaspoon) before reheating; the steam revives the glossy finish and restores that melt‑in‑your‑mouth softness.